
User's Manual
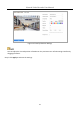

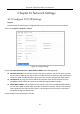


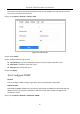


Table Of Contents
- Chapter 1 Introduction
- Chapter 2 Getting Started
- Chapter 3 Camera Management
- Chapter 4 Camera Settings
- Chapter 5 Live View
- Chapter 6 PTZ Control
- Chapter 7 Storage
- 7.1 Storage Device Management
- 7.2 Storage Mode
- 7.3 Recording Parameters
- 7.4 Configure Recording Schedule
- 7.5 Configure Continuous Recording
- 7.6 Configure Motion Detection Triggered Recording
- 7.7 Configure Event Triggered Recording
- 7.8 Configure Alarm Triggered Recording
- 7.9 Configure POS Event Triggered Recording
- 7.10 Configure Picture Capture
- 7.11 Configure Holiday Recording and Capture
- 7.12 Configure Redundant Recording and Capture
- Chapter 8 Disk Array
- Chapter 9 File Management
- Chapter 10 Playback
- Chapter 11 Event and Alarm Settings
- Chapter 12 VCA Event Alarm
- 12.1 Human Body Detection
- 12.2 Face Detection
- 12.3 Vehicle Detection
- 12.4 Line Crossing Detection
- 12.5 Intrusion Detection
- 12.6 Region Entrance Detection
- 12.7 Region Exiting Detection
- 12.8 Unattended Baggage Detection
- 12.9 Object Removal Detection
- 12.10 Audio Exception Detection
- 12.11 Sudden Scene Change Detection
- 12.12 Defocus Detection
- 12.13 PIR Alarm
- 12.14 Enable Smart Search
- Chapter 13 Smart Search
- Chapter 14 Human Body Detection
- Chapter 15 POS Configuration
- Chapter 16 Network Settings
- Chapter 17 Hot Spare Device Backup
- Chapter 18 System Maintenance
- Chapter 19 General System Settings
- Chapter 20 Appendix

Network Video Recorder User Manual
144
Figure 16-3 Service Terms
1) Create the verification code in the Verification Code text field.
2) Confirm the verification code.
3) Read Terms of Service and Privacy Policy before enabling the service.
4) Click OK to save the settings and return to the Hik-Connect page.
Figure 16-4 Hik-Connect Settings
Hik-Connect is disabled by default.
The verification code is empty when the device leaves factory.
The verification code must contain 6 to 12 letters or numbers and is case
sensitive.
Every time you enable Hik-Connect, the Service Terms page pops up and you
should read Terms of Service and Privacy Policy before enabling it.
Step 3 If you want to customize the server, enable Custom and enter the Server Address in the
text field.
Step 4 Click Save.
Step 5 After configuration, you can access and manage the DVR by your mobile phone or by the
website (www.hik-connect.com).