
Manual
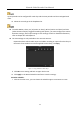
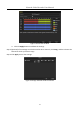


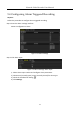
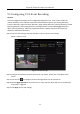

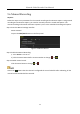
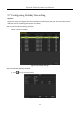
Table Of Contents
- Chapter 1 Introduction
- Chapter 2 Getting Started
- 2.1 Device Startup and Activation
- 2.2 Using Wizard for Basic Configuration
- 2.3 Adding and Connecting the IP Cameras
- Chapter 3 Live View
- Chapter 4 PTZ Controls
- Chapter 5 Recording Settings
- 5.1 Configuring Parameters
- 5.2 Configuring Recording Schedule
- 5.3 Configuring Motion Detection Recording
- 5.4 Configuring Alarm Triggered Recording
- 5.5 Configuring VCA Event Recording
- 5.6 Manual Recording
- 5.7 Configuring Holiday Recording
- 5.8 Configuring Redundant Recording
- 5.9 Configuring HDD Group for Recording
- 5.10 Files Protection
- Chapter 6 Playback
- Chapter 7 Backup
- Chapter 8 Alarm Settings
- Chapter 9 VCA Alarm
- Chapter 10 VCA Search
- Chapter 11 Network Settings
- 11.1 Configuring General Settings
- 11.2 Configuring Advanced Settings
- 11.2.1 Configuring Hik-Connect
- 11.2.2 Please refer to the help file on the official website (www.hik-connect.com) and the Hik-Connect Mobile Client User Manual for adding the device to Hik-Connect and more operation instructions.Configuring DDNS
- 11.2.3 Configuring PPPoE
- 11.2.4 Configuring NTP Server
- 11.2.5 Configuring SNMP
- 11.2.6 Configuring More Settings
- 11.2.7 Configuring HTTPS Port
- 11.2.8 Configuring Email
- 11.2.9 Configuring NAT
- 11.2.10 Configuring Virtual Host
- 11.3 Checking Network Traffic
- 11.4 Configuring Network Detection
- Chapter 12 HDD Management
- Chapter 13 Camera Settings
- Chapter 14 NVR Management and Maintenance
- Chapter 15 Others
- Chapter 16 Appendix

Network Video Recorder User Manual
80
Up to 8 periods can be configured for each day. And the time periods can’t be overlapped each
other.
IV. Select the record type in the dropdown list.
To enable Motion, Alarm, M | A (motion or alarm), M & A (motion and alarm) and VCA
(Video Content Analysis) triggered recording and capture, you must configure the motion
detection settings, alarm input settings or VCA settings as well. For detailed information,
refer to Chapter 8.1 and Chapter 9.
The VCA settings are only available to the smart IP cameras.
Repeat the above edit schedule steps to schedule recording or capture for other days in
the week. If the schedule can also be applied to other days, click Copy.
Figure 1. 1 Copy Schedule to Other Days
V. Click OK to save setting and back to upper level menu.
VI. Click Apply in the Record Schedule interface to save the settings.
Draw the schedule:
I. Click on the color icons, you can choose the schedule type as continuous or event.