
Manual
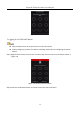
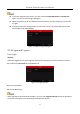
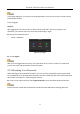
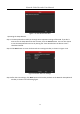
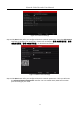
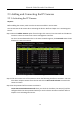
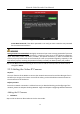
Table Of Contents
- Chapter 1 Introduction
- Chapter 2 Getting Started
- 2.1 Device Startup and Activation
- 2.2 Using Wizard for Basic Configuration
- 2.3 Adding and Connecting the IP Cameras
- Chapter 3 Live View
- Chapter 4 PTZ Controls
- Chapter 5 Recording Settings
- 5.1 Configuring Parameters
- 5.2 Configuring Recording Schedule
- 5.3 Configuring Motion Detection Recording
- 5.4 Configuring Alarm Triggered Recording
- 5.5 Configuring VCA Event Recording
- 5.6 Manual Recording
- 5.7 Configuring Holiday Recording
- 5.8 Configuring Redundant Recording
- 5.9 Configuring HDD Group for Recording
- 5.10 Files Protection
- Chapter 6 Playback
- Chapter 7 Backup
- Chapter 8 Alarm Settings
- Chapter 9 VCA Alarm
- Chapter 10 VCA Search
- Chapter 11 Network Settings
- 11.1 Configuring General Settings
- 11.2 Configuring Advanced Settings
- 11.2.1 Configuring Hik-Connect
- 11.2.2 Please refer to the help file on the official website (www.hik-connect.com) and the Hik-Connect Mobile Client User Manual for adding the device to Hik-Connect and more operation instructions.Configuring DDNS
- 11.2.3 Configuring PPPoE
- 11.2.4 Configuring NTP Server
- 11.2.5 Configuring SNMP
- 11.2.6 Configuring More Settings
- 11.2.7 Configuring HTTPS Port
- 11.2.8 Configuring Email
- 11.2.9 Configuring NAT
- 11.2.10 Configuring Virtual Host
- 11.3 Checking Network Traffic
- 11.4 Configuring Network Detection
- Chapter 12 HDD Management
- Chapter 13 Camera Settings
- Chapter 14 NVR Management and Maintenance
- Chapter 15 Others
- Chapter 16 Appendix

Network Video Recorder User Manual
38
2.3 Adding and Connecting the IP Cameras
2.3.1 Activating the IP Camera
Purpose:
Before adding the camera, make sure the IP camera to add is in active status.
You can activate the IP camera when activating the device. Refer to Chapter 2.1.2 Activating Your
Device.
Step 1 Select the Add IP Camera option from the right-click menu in live view mode or click Menu>
Camera> Camera to enter the IP camera management interface.
For the IP camera detected online in the same network segment, the Password status shows
whether it is active or inactive.
Figure 2-23 IP Camera Management Interface
Step 2 Click the inactive icon of the camera to enter the following interface to activate it. You can
also select multiple cameras from the list and click the One-touch Activate to activate the
cameras in batch.
Step 3 Set the password of the camera to activate it.
Use IP Camera Activation Password: when you check the checkbox, the camera (s) will be
configured with the same password which you set the device activation interface. Refer to
Chapter 2.1.2 Activating Your Device.