
Manual
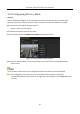
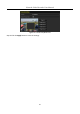
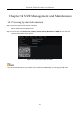
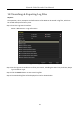
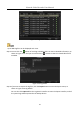
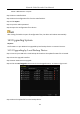
Table Of Contents
- Chapter 1 Introduction
- Chapter 2 Getting Started
- 2.1 Device Startup and Activation
- 2.2 Using Wizard for Basic Configuration
- 2.3 Adding and Connecting the IP Cameras
- Chapter 3 Live View
- Chapter 4 PTZ Controls
- Chapter 5 Recording Settings
- 5.1 Configuring Parameters
- 5.2 Configuring Recording Schedule
- 5.3 Configuring Motion Detection Recording
- 5.4 Configuring Alarm Triggered Recording
- 5.5 Configuring VCA Event Recording
- 5.6 Manual Recording
- 5.7 Configuring Holiday Recording
- 5.8 Configuring Redundant Recording
- 5.9 Configuring HDD Group for Recording
- 5.10 Files Protection
- Chapter 6 Playback
- Chapter 7 Backup
- Chapter 8 Alarm Settings
- Chapter 9 VCA Alarm
- Chapter 10 VCA Search
- Chapter 11 Network Settings
- 11.1 Configuring General Settings
- 11.2 Configuring Advanced Settings
- 11.2.1 Configuring Hik-Connect
- 11.2.2 Please refer to the help file on the official website (www.hik-connect.com) and the Hik-Connect Mobile Client User Manual for adding the device to Hik-Connect and more operation instructions.Configuring DDNS
- 11.2.3 Configuring PPPoE
- 11.2.4 Configuring NTP Server
- 11.2.5 Configuring SNMP
- 11.2.6 Configuring More Settings
- 11.2.7 Configuring HTTPS Port
- 11.2.8 Configuring Email
- 11.2.9 Configuring NAT
- 11.2.10 Configuring Virtual Host
- 11.3 Checking Network Traffic
- 11.4 Configuring Network Detection
- Chapter 12 HDD Management
- Chapter 13 Camera Settings
- Chapter 14 NVR Management and Maintenance
- Chapter 15 Others
- Chapter 16 Appendix

Network Video Recorder User Manual
190
13.2 Configuring Privacy Mask
Purpose:
You are allowed to configure the four-sided privacy mask zones that cannot be viewed by the
operator. The privacy mask can prevent certain surveillance areas to be viewed or recorded.
Step 1 Enter the Privacy Mask Settings interface.
Menu > Camera >Privacy Mask
Step 2 Select the camera to set privacy mask.
Step 3 Click the checkbox of Enable Privacy Mask to enable this feature.
Figure 13-2 Privacy Mask Settings Interface
Step 4 Use the mouse to draw a zone on the window. The zones will be marked with different
frame colors.
Up to 4 privacy masks zones can be configured and the size of each area can be adjusted.
Step 5 The configured privacy mask zones on the window can be cleared by clicking the
corresponding Clear Zone1-4 icons on the right side of the window, or click Clear All to clear
all zones.