
Manual
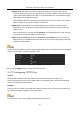
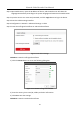
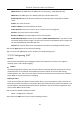
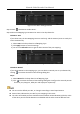
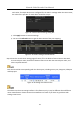
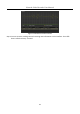
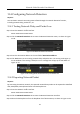
Table Of Contents
- Chapter 1 Introduction
- Chapter 2 Getting Started
- 2.1 Device Startup and Activation
- 2.2 Using Wizard for Basic Configuration
- 2.3 Adding and Connecting the IP Cameras
- Chapter 3 Live View
- Chapter 4 PTZ Controls
- Chapter 5 Recording Settings
- 5.1 Configuring Parameters
- 5.2 Configuring Recording Schedule
- 5.3 Configuring Motion Detection Recording
- 5.4 Configuring Alarm Triggered Recording
- 5.5 Configuring VCA Event Recording
- 5.6 Manual Recording
- 5.7 Configuring Holiday Recording
- 5.8 Configuring Redundant Recording
- 5.9 Configuring HDD Group for Recording
- 5.10 Files Protection
- Chapter 6 Playback
- Chapter 7 Backup
- Chapter 8 Alarm Settings
- Chapter 9 VCA Alarm
- Chapter 10 VCA Search
- Chapter 11 Network Settings
- 11.1 Configuring General Settings
- 11.2 Configuring Advanced Settings
- 11.2.1 Configuring Hik-Connect
- 11.2.2 Please refer to the help file on the official website (www.hik-connect.com) and the Hik-Connect Mobile Client User Manual for adding the device to Hik-Connect and more operation instructions.Configuring DDNS
- 11.2.3 Configuring PPPoE
- 11.2.4 Configuring NTP Server
- 11.2.5 Configuring SNMP
- 11.2.6 Configuring More Settings
- 11.2.7 Configuring HTTPS Port
- 11.2.8 Configuring Email
- 11.2.9 Configuring NAT
- 11.2.10 Configuring Virtual Host
- 11.3 Checking Network Traffic
- 11.4 Configuring Network Detection
- Chapter 12 HDD Management
- Chapter 13 Camera Settings
- Chapter 14 NVR Management and Maintenance
- Chapter 15 Others
- Chapter 16 Appendix

Network Video Recorder User Manual
163
Before configuring the Email settings, the NVR must be connected to a local area network (LAN)
that maintains an SMTP mail server. The network must also be connected to either an intranet or
the Internet depending on the location of the e-mail accounts to which you want to send
notification.
Step 1 Enter the Network Settings interface.
Menu >Configuration> Network
Step 2 Set the IPv4 Address, IPv4 Subnet Mask, IPv4 Gateway and the Preferred DNS Server in the
Network Settings menu, as shown in Figure 11-20.
Figure 11-20 Network Settings Interface
Step 3 Click Apply to save the settings.
Step 4 Select the Email tab to enter the Email Settings interface.
Figure 11-21 Email Settings Interface
Step 5 Configure the following Email settings:
Enable Server Authentication (optional): Check the checkbox to enable the server
authentication feature.
User Name: The user name of sender’s account registered on the SMTP server.
Password: The password of sender’s account registered on the SMTP server.