
Manual


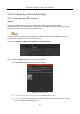
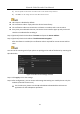
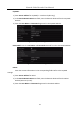

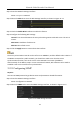
Table Of Contents
- Chapter 1 Introduction
- Chapter 2 Getting Started
- 2.1 Device Startup and Activation
- 2.2 Using Wizard for Basic Configuration
- 2.3 Adding and Connecting the IP Cameras
- Chapter 3 Live View
- Chapter 4 PTZ Controls
- Chapter 5 Recording Settings
- 5.1 Configuring Parameters
- 5.2 Configuring Recording Schedule
- 5.3 Configuring Motion Detection Recording
- 5.4 Configuring Alarm Triggered Recording
- 5.5 Configuring VCA Event Recording
- 5.6 Manual Recording
- 5.7 Configuring Holiday Recording
- 5.8 Configuring Redundant Recording
- 5.9 Configuring HDD Group for Recording
- 5.10 Files Protection
- Chapter 6 Playback
- Chapter 7 Backup
- Chapter 8 Alarm Settings
- Chapter 9 VCA Alarm
- Chapter 10 VCA Search
- Chapter 11 Network Settings
- 11.1 Configuring General Settings
- 11.2 Configuring Advanced Settings
- 11.2.1 Configuring Hik-Connect
- 11.2.2 Please refer to the help file on the official website (www.hik-connect.com) and the Hik-Connect Mobile Client User Manual for adding the device to Hik-Connect and more operation instructions.Configuring DDNS
- 11.2.3 Configuring PPPoE
- 11.2.4 Configuring NTP Server
- 11.2.5 Configuring SNMP
- 11.2.6 Configuring More Settings
- 11.2.7 Configuring HTTPS Port
- 11.2.8 Configuring Email
- 11.2.9 Configuring NAT
- 11.2.10 Configuring Virtual Host
- 11.3 Checking Network Traffic
- 11.4 Configuring Network Detection
- Chapter 12 HDD Management
- Chapter 13 Camera Settings
- Chapter 14 NVR Management and Maintenance
- Chapter 15 Others
- Chapter 16 Appendix

Network Video Recorder User Manual
158
Step 1 Enter the Network Settings interface.
Menu >Configuration> Network
Step 2 Select the NTP tab to enter the NTP Settings interface, as shown in Figure 11-11.
Figure 11-11 NTP Settings Interface
Step 3 Check the Enable NTP checkbox to enable this feature.
Step 4 Configure the following NTP settings:
Interval: Time interval between the two synchronizing actions with NTP server. The unit is
minute.
NTP Server: IP address of NTP server.
NTP Port: Port of NTP server.
Step 5 Click the Apply button to save and exit the interface.
The time synchronization interval can be set from1 to 10080min, and the default value is 60min. If
the NVR is connected to a public network, you should use a NTP server that has a time
synchronization function, such as the server at the National Time Center (IP Address:
210.72.145.44). If the NVR is setup in a more customized network, NTP software can be used to
establish a NTP server used for time synchronization.
11.2.5 Configuring SNMP
Purpose:
You can use SNMP protocol to get device status and parameters related information.
Step 1 Enter the Network Settings interface.
Menu >Configuration> Network
Step 2 Select the SNMP tab to enter the SNMP Settings interface, as shown in Figure 11-12.
Figure 11-12 SNMP Settings Interface