
User's Manual
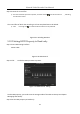


Table Of Contents
- Chapter 1 Introduction
- Chapter 2 Getting Started
- 2.1 Device Startup and Activation
- 2.2 Using Wizard for Basic Configuration
- 2.3 Adding and Connecting the IP Cameras
- Chapter 3 Live View
- Chapter 4 PTZ Controls
- Chapter 5 Recording Settings
- 5.1 Configuring Parameters
- 5.2 Configuring Recording Schedule
- 5.3 Configuring Motion Detection Recording
- 5.4 Configuring Alarm Triggered Recording
- 5.5 Configuring VCA Event Recording
- 5.6 Manual Recording
- 5.7 Configuring Holiday Recording
- 5.8 Configuring Redundant Recording
- 5.9 Configuring HDD Group for Recording
- 5.10 Files Protection
- Chapter 6 Playback
- Chapter 7 Backup
- Chapter 8 Alarm Settings
- Chapter 9 VCA Alarm
- Chapter 10 VCA Search
- Chapter 11 Network Settings
- Chapter 12 HDD Management
- Chapter 13 Camera Settings
- Chapter 14 NVR Management and Maintenance
- Chapter 15 Others
- Chapter 16 Appendix

Network Video Recorder User Manual
109
Step 9 Enter the playback interface.
The toolbar in the bottom part of playback interface can be used to control playing process.
Figure 6-10 Interface of Playback by Event
You can click or button to select the previous or next event. Please refer to Table 6.1 for
the description of buttons on the toolbar.
6.1.5 Playing Back by Tag
Purpose:
Video tag allows you to record related information like people and location of a certain time point
during playback. You can use video tag(s) to search for record files and position time point.
Before playing back by tag:
Step 1 Enter Playback interface.
Menu>Playback
Step 2 Search and play back the record file(s). Refer to Chapter 6.1.1 for the detailed information
about searching and playback of the record files.