
User's Manual


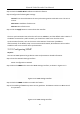


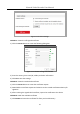


Table Of Contents
- Chapter 1 Introduction
- Chapter 2 Getting Started
- 2.1 Device Startup and Activation
- 2.2 Using Wizard for Basic Configuration
- 2.3 Adding and Connecting the IP Cameras
- Chapter 3 Live View
- Chapter 4 PTZ Controls
- Chapter 5 Recording Settings
- 5.1 Configuring Parameters
- 5.2 Configuring Recording Schedule
- 5.3 Configuring Motion Detection Recording
- 5.4 Configuring Alarm Triggered Recording
- 5.5 Configuring VCA Event Recording
- 5.6 Manual Recording
- 5.7 Configuring Holiday Recording
- 5.8 Configuring Redundant Recording
- 5.9 Configuring HDD Group for Recording
- 5.10 Files Protection
- Chapter 6 Playback
- Chapter 7 Backup
- Chapter 8 Alarm Settings
- Chapter 9 VCA Alarm
- Chapter 10 VCA Search
- Chapter 11 Network Settings
- Chapter 12 HDD Management
- Chapter 13 Camera Settings
- Chapter 14 NVR Management and Maintenance
- Chapter 15 Others
- Chapter 16 Appendix

Network Video Recorder User Manual
169
Step 3 Check checkbox to enable UPnP™.
Step 4 Select the Mapping Type as Manual or Auto in the drop-down list.
OPTION 1: Auto
If you select Auto, the Port Mapping items are read-only, and the external ports are set by the
router automatically.
1) Select Auto in the drop-down list of Mapping Type.
2) Click Apply button to save the settings.
3) You can click Refresh button to get the latest status of the port mapping.
Figure 11-23 UPnP™ Settings Finished-Auto
OPTION 2: Manual
If you select Manual as the mapping type, you can edit the external port on your demand by
clicking to activate the External Port Settings dialog box.
Steps:
1) Select Manual in the drop-down list of Mapping Type.
2) Click to activate the External Port Settings dialog box. Configure the external port No.
for server port, http port, RTSP port and https port respectively.