
User's Manual
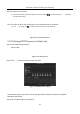


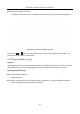
Table Of Contents
- Chapter 1 Introduction
- Chapter 2 Getting Started
- 2.1 Device Startup and Activation
- 2.2 Using Wizard for Basic Configuration
- 2.3 Adding and Connecting the IP Cameras
- Chapter 3 Live View
- Chapter 4 PTZ Controls
- Chapter 5 Recording Settings
- 5.1 Configuring Parameters
- 5.2 Configuring Recording Schedule
- 5.3 Configuring Motion Detection Recording
- 5.4 Configuring Alarm Triggered Recording
- 5.5 Configuring VCA Event Recording
- 5.6 Manual Recording
- 5.7 Configuring Holiday Recording
- 5.8 Configuring Redundant Recording
- 5.9 Configuring HDD Group for Recording
- 5.10 Files Protection
- Chapter 6 Playback
- Chapter 7 Backup
- Chapter 8 Alarm Settings
- Chapter 9 VCA Alarm
- Chapter 10 VCA Search
- Chapter 11 Network Settings
- Chapter 12 HDD Management
- Chapter 13 Camera Settings
- Chapter 14 NVR Management and Maintenance
- Chapter 15 Others
- Chapter 16 Appendix

Network Video Recorder User Manual
100
Step 5 Protect the record files.
1) Find the record files you want to protect, and then click the icon which will turn to , indicating
that the file is locked.
The record files of which the recording is still not completed cannot be locked.
2) Click to change it to to unlock the file and the file is not protected.
Figure 5-31 Unlocking Attention
5.10.2 Setting HDD Property to Read-only
Step 1 Enter HDD setting interface.
Menu> HDD
Figure 5-32 HDD General
Step 2 Click to edit the HDD you want to protect.
Figure 5-33 HDD General- Editing
To edit HDD property, you need to set the storage mode of the HDD to Group. See Chapter
Managing HDD Group.
Step 3 Set the HDD property to Read-only.