
Quick Start Guide


DS-76xxNI-QxxP NVR Quick Start Guide
QSG DS-76xxNI-QxxP 062618NA 7
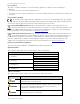
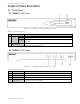
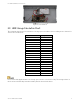
No.
Item
Description
1
Power Supply
100~240 VAC power supply
2
Audio In
RCA connector for audio input
3
HDMI Interface
HDMI video output connector
4
LAN Network Interface
1, 10 /100 /1000 Mbps self
-
adaptive Ethernet interface
5
Audio Out
RCA connector for audio output
6
VGA Interface
DB9 connector for VGA output. Display
local video output and menu.
7 USB Interface
Universal Serial Bus (USB) ports for additional devices such as USB
mouse and USB Hard Disk Drive (HDD)
8
Ground
Ground (needs to be connected when NVR starts up)
9
Power Switch
Switch for turning on/off the
device
10
Network
Interfaces
with PoE function
Network interfaces for the cameras and to provide power over
Ethernet
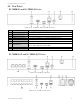
Chapter 2 Installation and Connections
2.1 NVR Installation
During installation of the NVR:
•
Use brackets for rack mounting.
•
Ensure ample room for audio and video cables.
•
When routing cables, ensure that the bend radius of the cables are no less than five times than its
diameter.
•
Connect the alarm cable.
•
Allow at least 2 cm (≈0.75-inch) of space between rack-mounted devices.
•
Ensure the NVR is grounded.
•
Environmental temperature should be within the range of -10° to +55° C, +14° to +131° F.
•
Environmental humidity should be within the range of 10% to 90%.
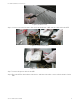
2.2 Hard Disk Installation
Before you start:
Disconnect the power from the NVR before installing a hard disk drive (HDD). A factory recommended
HDD should be used for this installation.
Tools Required: Screwdriver
Step 1 Remove the cover from the NVR by unfastening the screws on the rear and side panel.