
User Manual


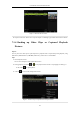
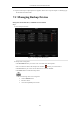


Table Of Contents
- Product Key Features
- Chapter 1 Introduction
- Chapter 2 Getting Started
- Chapter 3 Live View
- Chapter 4 PTZ Controls
- Chapter 5 Recording and Capture Settings
- 5.1 Configuring Parameters
- 5.2 Configuring Recording and Capture Schedule
- 5.3 Configuring Motion Detection Recording and Capture
- 5.4 Configuring Alarm Triggered Recording and Capture
- 5.5 Manual Recording and Continuous Capture
- 5.6 Configuring Holiday Recording and Capture
- 5.7 Configuring Redundant Recording and Capture
- 5.8 Configuring HDD Group for Recording and Capture
- 5.9 Files Protection
- Chapter 6 Playback
- 6.1 Playing Back Record Files
- 6.2 Auxiliary Functions of Playback
- Chapter 7 Backup
- Chapter 8 Alarm Settings
- Chapter 9 VCA Alarm
- 9.1 Face Recognition
- 9.2 Face Detection
- 9.3 Vehicle Detection
- 9.4 Line Crossing Detection
- 9.5 Intrusion Detection
- 9.6 Region Entrance Detection
- 9.7 Region Exiting Detection
- 9.8 Loitering Detection
- 9.9 People Gathering Detection
- 9.10 Fast Moving Detection
- 9.11 Parking Detection
- 9.12 Unattended Baggage Detection
- 9.13 Object Removal Detection
- 9.14 Audio Exception Detection
- 9.15 Sudden Scene Change Detection
- 9.16 Defocus Detection
- 9.17 PIR Alarm
- Chapter 10 VCA Search
- Chapter 11 Network Settings
- 11.1 Configuring General Settings
- 11.2 Configuring Advanced Settings
- 11.2.1 Configuring PPPoE Settings
- 11.2.2 Configuring EZVIZ Cloud P2P
- 11.2.3 Configuring DDNS
- 11.2.4 Configuring NTP Server
- 11.2.5 Configuring SNMP
- 11.2.6 Configuring More Settings
- 11.2.7 Configuring HTTPS Port
- 11.2.8 Configuring Email
- 11.2.9 Configuring NAT
- 11.2.10 Configuring High-speed Download
- 11.2.11 Configuring Virtual Host
- 11.3 Checking Network Traffic
- 11.4 Configuring Network Detection
- Chapter 12 RAID
- Chapter 13 HDD Management
- Chapter 14 Camera Settings
- Chapter 15 NVR Management and Maintenance
- Chapter 16 Others
- Chapter 17 Appendix

User Manual of Network Video Recorder
116
7.3.2 Setting Working Device
Steps:
1. Enter the Hot Spare settings interface.
Menu > Configuration > Hot Spare
2. Set the Work Mode as Normal Mode (default).
3. Check the checkbox of Enable to enable the hot spare function.
4. Enter the IP address and admin password of hot spare device.
Figure 7. 15 Setting Working Mode for Working device
5. Click the Apply button to save the settings.
7.3.3 Managing Hot Spare System
Steps:
1. Enter the Hot Spare Settings interface of the hot spare device.
Menu > Configuration > Hot Spare
The connected working device is displayed on the device list.
2. Check the checkbox to select the working device from the device list, and click the Add button to link the
working device to the hot spare device.
A hot spare device can connect up to 32 working devices.