
Operation Manual


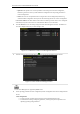

Table Of Contents
- Product Key Features
- Chapter 1 Introduction
- Chapter 2 Getting Started
- Chapter 3 Live View
- Chapter 4 PTZ Controls
- Chapter 5 Record Settings
- Chapter 6 Playback
- Chapter 7 Backup
- Chapter 8 Alarm Settings
- Chapter 9 Network Settings
- 9.1 Configuring General Settings
- 9.2 Configuring Advanced Settings
- 9.2.1 Configuring Extranet Access
- 9.2.2 Configuring PPPoE Settings
- 4.5.1 9.2.3 Configuring NTP Server
- 9.2.4 Configuring SNMP
- 9.2.5 Configuring NAT
- 9.2.6 Configuring Remote Alarm Host
- 9.2.7 Configuring Multicast
- 9.2.8 Configuring RTSP
- 9.2.9 Configuring Server and HTTP Ports
- 9.2.10 Configuring HTTPS Settings
- 9.2.11 Configuring Email
- 9.3 Checking Network Traffic
- 9.4 Network Detection
- Chapter 10 HDD Management
- Chapter 11 Camera Settings
- Chapter 12 Device Management and Maintenance
- Chapter 13 Others
- Chapter 14 Appendix

User Manual of DS-7200/7300/8100-SH Series DVR
206
13.4 Configuring More Settings
Steps:
1. Enter the General Settings interface.
Menu > Configuration > General
2. Click the More Settings tab to enter the More Settings interface.
Figure 13. 4 More Settings Interface
3. Configure the following settings:
• Device Name: Edit the name of device.
• Device No.: Edit the serial number of device. The Device No. can be set in the range of 1~255, and
the default No. is 255.
• CVBS Output Brightness: Adjust the video output brightness.
• Operation Timeout: Set timeout time for menu inactivity. E.g., when the timeout time is set to 5
Minutes, the system will exit from the current operation menu to live view screen after 5 minutes
of menu inactivity.
• Menu Output Mode: Select the menu output mode to Auto, HDMI/VGA or Main CVBS.
When you select Auto, the device can automatically detect the HDMI/VGA output as the main
output and the CVBS output as the auxiliary output when it starts up.
After you have changed the output mode, you should restart the device to activate the new
settings.
• Main CVBS Scaling: Enable/disable video output scaling for main CVBS video output.
4. Click the Apply button to save the settings.