
Operation Manual


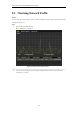


Table Of Contents
- Product Key Features
- Chapter 1 Introduction
- Chapter 2 Getting Started
- Chapter 3 Live View
- Chapter 4 PTZ Controls
- Chapter 5 Record Settings
- Chapter 6 Playback
- Chapter 7 Backup
- Chapter 8 Alarm Settings
- Chapter 9 Network Settings
- 9.1 Configuring General Settings
- 9.2 Configuring Advanced Settings
- 9.2.1 Configuring Extranet Access
- 9.2.2 Configuring PPPoE Settings
- 4.5.1 9.2.3 Configuring NTP Server
- 9.2.4 Configuring SNMP
- 9.2.5 Configuring NAT
- 9.2.6 Configuring Remote Alarm Host
- 9.2.7 Configuring Multicast
- 9.2.8 Configuring RTSP
- 9.2.9 Configuring Server and HTTP Ports
- 9.2.10 Configuring HTTPS Settings
- 9.2.11 Configuring Email
- 9.3 Checking Network Traffic
- 9.4 Network Detection
- Chapter 10 HDD Management
- Chapter 11 Camera Settings
- Chapter 12 Device Management and Maintenance
- Chapter 13 Others
- Chapter 14 Appendix

User Manual of DS-7200/7300/8100-SH Series DVR
166
9.4 Network Detection
Purpose:
You can obtain network connecting status of device through the network detection function, including network
delay, packet loss, etc.
9.4.1 Testing Network Delay and Packet Loss
Steps:
1. Enter the Network Traffic interface.
Menu > Maintenance > Net Detect
2. Click the Network Detection tab to enter the Network Detection menu.
Figure 9. 40 Network Detection Interface
3. Enter the destination address in the text field of Destination Address.
4. Click the Test button to start testing network delay and packet loss. The testing result pops up on the
window. If the testing is failed, the error message box will pop up as well. .
Figure 9. 41 Testing Result of Network Delay and Packet Loss
9.4.2 Exporting Network Packet
Purpose:
By connecting the device to network, the captured network data packet can be exported to USB-flash disk and
other local backup devices.
Steps:
1. Enter the Network Traffic interface.
Menu > Maintenance > Net Detect
2. Click the Network Detection tab to enter the Network Detection interface.