
Operation Manual


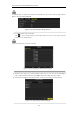


Table Of Contents
- Product Key Features
- Chapter 1 Introduction
- Chapter 2 Getting Started
- Chapter 3 Live View
- Chapter 4 PTZ Controls
- Chapter 5 Record Settings
- Chapter 6 Playback
- Chapter 7 Backup
- Chapter 8 Alarm Settings
- Chapter 9 Network Settings
- 9.1 Configuring General Settings
- 9.2 Configuring Advanced Settings
- 9.2.1 Configuring Extranet Access
- 9.2.2 Configuring PPPoE Settings
- 4.5.1 9.2.3 Configuring NTP Server
- 9.2.4 Configuring SNMP
- 9.2.5 Configuring NAT
- 9.2.6 Configuring Remote Alarm Host
- 9.2.7 Configuring Multicast
- 9.2.8 Configuring RTSP
- 9.2.9 Configuring Server and HTTP Ports
- 9.2.10 Configuring HTTPS Settings
- 9.2.11 Configuring Email
- 9.3 Checking Network Traffic
- 9.4 Network Detection
- Chapter 10 HDD Management
- Chapter 11 Camera Settings
- Chapter 12 Device Management and Maintenance
- Chapter 13 Others
- Chapter 14 Appendix

User Manual of DS-7200/7300/8100-SH Series DVR
148
If the DHCP server is available, you can click the checkbox of DHCP to automatically obtain an IP
address and other network settings from that server.
When the DHCP is failed, the default IP address (192.168.1.64) will be used.
The valid value range of MTU is 500 ~ 1500.
4. After having configured the general settings, click the Apply button to save the settings.
Steps (for DS-8100-SH):
1. Enter the Network Settings interface.
Menu > Configuration > Network
2. Select the General tab.
Figure 9. 3 General Network Settings of DS-8100-SH
The DS-8100-SH models provide two 10M/100M/1000Mbps self-adaptive network interfaces.
3. Select the working mode.
Multi-address Mode: The parameters of the two NIC cards can be configured independently. You can
select LAN1 or LAN2 in Select NIC field for parameter settings.
You can select one NIC card as default route. And when the system is connecting with the extranet the
data will be forwarded through the default route.