
Spec Sheet


6 | P a g e
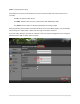
STEP 4 – Port Forwarding
In simplest terms, port forwarding is similar to a virtual conduit. We need to write “rules” that allow
traffic from the Internet to enter the “WAN” (Wide Area Network) side of our router and translate to
our recorder on the “LAN” (Local Area Network) side. Consider this like a direct translation from the
front door of a house to one of the private internal doors. Port forwarding is similar to sending each
visitor to a home to the room of the person they’ve come to see. In terms of the NVR or DVR, we have
to send the visitors wishing to view live video and playback to three separate “doors” or ports within our
“house” or LAN.
The first step in performing this task is to gain access to the customer’s router. Typically there is a login
and password involved that the customer must provide you with. It may make sense to request this
information from the customer prior to arriving on site. Occasionally the information required will be
available from a sticker on the router itself.
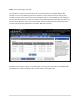
Remember on Page 3, we made it a point to note the “gateway” address, which is synonymous with
“router.” Our next step once we have the proper login information is to connect to the customer’s LAN
using a laptop, or other computer that the customer has provided. In the example we’ve used
throughout this documentation, the router’s address is 192.168.1.1 – this will vary from one install to
the next, but 192.168.1.1 is likely the most common address used in non-commercial installations. In our
next step, we will open a web browser (Firefox, Internet Explorer, Safari, etc.) and access the router: