
Operation Manual


User Manual of Digital Video Recorder
70
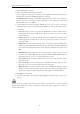
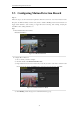
1) Select the Record tab to configure.
2) Select a camera number in the camera dropdown list.
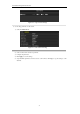
You can configure the stream type, the resolution, the video quality and other parameters on demand
for Main Stream (Continuous) and Main Stream (Event) respectively.
The Input Resolution of camera connected will be displayed in the live view for 5 seconds when the
camera is connected, or the DVR is powered on. The input resolution includes the resolution and
frame rate of the camera, e.g. 1080P25.
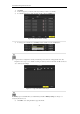
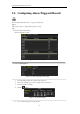
3) You can configure the advantage parameters, including pre-record, post-record time, expired time,
redundant record (this option is only available when the HDD mode is Group) and whether you want
to record audio.
• Pre-record: The time you set to record before the scheduled time or event. For example, when an
alarm triggered the recording at 10:00, if you set the pre-record time as 5 seconds, the camera
records it at 9:59:55.
• Post-record: The time you set to record after the event or the scheduled time. For example, when
an alarm triggered the recording ends at 11:00, if you set the post-record time as 5 seconds, it
records till 11:00:05.
• Expired Time: The expired time is the longest time for a record file to be kept in the HDD, if the
deadline is reached, the file will be deleted. You can set the expired time to 0, and then the file will
not be deleted. The actual keeping time for the file should be determined by the capacity of the
HDD.
• Redundant Record: The redundant record is to decide whether you want the camera to save the
record files in the redundant HDD. You must configure the redundant HDD in HDD settings. For
detailed information, see Chapter 5.8 Configuring Redundant Recording.
• Record Audio: Check the checkbox of Record Audio to record the sound, otherwise record the
image without sound.
• Video Stream: Main stream and sub-stream are selectable for recording. When you select
sub-stream, you can record for a longer time with the same storage space.
• Enable 960 Mode: The option is supported by analog cameras. Enabling the 960 mode to enable
the WD1 resolution for the main stream, otherwise, the resolution supports up to 4CIF. And the
option does not supported by TVI cameras, while the WD1 resolution is available all the time.
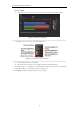
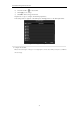
4) Click Apply to save the settings.
5) You can copy the settings to other channels by clicking Copy, if the setting can also be used for other
cameras.
You can copy the same settings to the cameras with same signal, e.g., the channel No. 1-3 connect to the TVI
cameras, and the channel No.4 connects to an analog camera, and then the settings of channel No. 1 can be only
copied to channel 2 and 3.