
Operation Manual


User Manual of Digital Video Recorder
147
9.2.6 Configuring More Settings
Steps:
1. Enter the Network Settings interface.
Menu > Configuration > Network
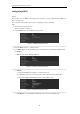
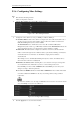
2. Select the More Settings tab to enter the More Settings interface.
Figure 9. 20 More Settings Interface
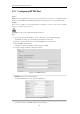
3. Configure the remote alarm host, server port, HTTP port, multicast, RTSP port.
Alarm Host IP/Port: With a remote alarm host configured, the device will send the alarm event or
exception message to the host when an alarm is triggered. The remote alarm host must have the
CMS (Client Management System) software installed.
The Alarm Host IP refers to the IP address of the remote PC on which the CMS (Client
Management System) software (e.g., iVMS-4200) is installed, and the Alarm Host Port must be the
same as the alarm monitoring port configured in the software (default port is 7200).
Multicast IP: The multicast can be configured to realize live view for more than the maximum
number of cameras through network. A multicast address spans the Class-D IP range of 224.0.0.0 to
239.255.255.255. It is recommended to use the IP address ranging from 239.252.0.0 to
239.255.255.255.
When adding a device to the CMS (Client Management System) software, the multicast address
must be the same as the device’s multicast IP.
RTSP Port: The RTSP (Real Time Streaming Protocol) is a network control protocol designed for
use in entertainment and communications systems to control streaming media servers.
Enter the RTSP port in the text field of RTSP Port. The default RTSP port is 554, and you can
change it according to different requirements.
Server Port and HTTP Port: Enter the Server Port and HTTP Port in the text fields. The default
Server Port is 8000 and the HTTP Port is 80, and you can change them according to different
requirements.
The Server Port should be set to the range of 2000-65535 and it is used for remote client software
access. The HTTP port is used for remote IE access.
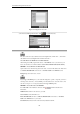
Figure 9. 21 Configure More Settings
4. Click the Apply button to save and exit the interface.