
Quick Start Guide

13 S E T U P R E C O R D I N G ( c o n t i n u e d )
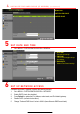
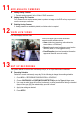
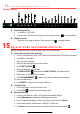
• More Setting…
1. Click More Setting… to display additional settings.
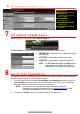
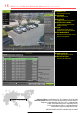
14 P L A Y B A C K R E C O R D E D V I D E O
1. Go to MENU > PLAYBACK and select the desired camera(s) from the menu on the right.
2. Select date (days w/recordings will be blue if continuous only or yellow if day has event recording).
3. Press PLAY (click within the timeline to jump to desired time).
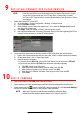
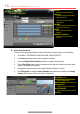
PLAYBACK TYPE MENU
Select type of record to play
FULL SCREEN
Goes to full screen for multiple
channel playback
PLAY/STOP
Begin playback (toggles between
Play and Stop)
CAMERA LIST
Select camera(s) to play back
CALENDAR
Select date to play back
TIMELINE
Click on timeline to jump to
desired playback time
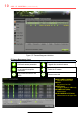
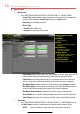
SUBSTREAM TAB
(Select)
CAMERA (Select Camera)
STREAM TYPE (Select Choice)
RESOLUTION (Up to 4CIF)
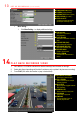
VIDEO QUALITY
# of green squares sets quality
(in example, sensitivity is 3)
PRE
-
RECORD
Seconds to record before
recording starts
POST RECORD
Seconds to record after recording
ends
EXPIRED TIME (DAY)
Days to keep the recording
REDUNDANT RECORD
Record to redundant drive
RECORD AUDIO
Check to record audio
VIDEO STREAM
Choose which video stream to
record