
User Manual


DS-6700HQHI-SATA Series Encoder User Manual
37
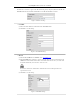
2) Enter the IP address of the designated storage server.
3) Click Search and the available NAS or IP SAN disks in this storage server will be listed below.
3. Select and double click on the searched NAS or IP SAN disk from the list to add it, as shown in Figure 6.20.
You can also manually add the NAS or IP SAN by entering the IP address of the server and file path in the
text filed.
NAS Mode: Enter the IP address of the storage device, and the default file path is /dvr/share, in which the
share name is user-defined during creating the DVR of the network storage.
IP SAN mode: Enter the IP address of the storage device, and the default file path is
iqn.2004-05.storos.t-service ID, in which the service ID is user-defined during creating the iSCSI volume of
the network storage.
4. Click the Save button to add the configured network disk.
Figure 5. 20 Network Disk Settings
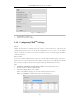
5. Initialize the added network disk.
1) Click Remote Configuration > HDD Management to enter the HDD settings menu, on which you can
view the capacity, free space, status, type and property of the added network disk.
2) If the status of the network disk is Uninitialized, select the disk from the list by checking the checkbox
and click the Init button to start initializing the disk.
3) When the initialization is complete, the status of disk will become Normal.