DS-6700HQHI-SATA Series Encoder User Manual DS-6700HQHI-SATA Series Encoder User Manual UD.
DS-6700HQHI-SATA Series Encoder User Manual About this Manual This Manual is applicable to DS-6700HQHI-SATA Series Encoder. The Manual includes instructions for using and managing the product. Pictures, charts, images and all other information hereinafter are for description and explanation only. The information contained in the Manual is subject to change, without notice, due to firmware updates or other reasons.
DS-6700HQHI-SATA Series Encoder User Manual Regulatory Information FCC Information FCC compliance: This equipment has been tested and found to comply with the limits for a Class A digital device, pursuant to part 15 of the FCC Rules. These limits are designed to provide reasonable protection against harmful interference when the equipment is operated in a commercial environment.
DS-6700HQHI-SATA Series Encoder User Manual Safety Instruction These instructions are intended to ensure that user can use the product correctly to avoid danger or property loss. The precaution measure is divided into “Warnings” and “Cautions” Warnings: Serious injury or death may occur if any of the warnings are neglected. Cautions: Injury or equipment damage may occur if any of the cautions are neglected. Warnings Follow these safeguards to prevent serious injury or death.
DS-6700HQHI-SATA Series Encoder User Manual Preventive and Cautionary Tips Before connecting and operating your device, please be advised of the following tips: • • • • • Ensure unit is installed in a well-ventilated, dust-free environment. Unit is designed for indoor use only. Keep all liquids away from the device. Ensure environmental conditions meet factory specifications. Ensure unit is properly secured to a rack or shelf.
DS-6700HQHI-SATA Series Encoder User Manual TABLE OF CONTENTS Product Key Features ...................................................................................................................................... 7 Chapter 1 Introduction .......................................................................................................................... 9 1.1 Front Panel ............................................................................................................................
DS-6700HQHI-SATA Series Encoder User Manual 6.1 Configuring OSD Settings ............................................................................................................. 44 6.1.1 Configuring Display Settings ............................................................................................. 44 6.1.2 Configuring Text Overlay .................................................................................................. 45 6.2 Configuring Video Settings ..........................
DS-6700HQHI-SATA Series Encoder User Manual Product Key Features General Connectable to HD-TVI and analog cameras Connectable to the Coaxitron camera/dome with long transmission distance Each channel supports dual-stream with up to 1080p resolution Independent configuration for each channel, including resolution, frame rate, bit rate, image quality, etc Encoding for both video stream and video and audio stream; audio and video synchronization during composite stream encoding Watermark technolog
DS-6700HQHI-SATA Series Encoder User Manual Supports pause, fast forward, slow forward, skip forward, and skip backward when playback, locating by dragging the mouse on the progress bar Alarm and Exception Configurable arming time of alarm input/output Alarm for video loss, motion detection, video tampering, abnormal signal, video input/recording resolution mismatch, illegal login, network disconnected, IP confliction, record exception, HDD error, and HDD full, etc.
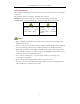
DS-6700HQHI-SATA Series Encoder User Manual Chapter 1 Introduction 1.1 Front Panel DS-6708HQHI-SATA/DS-6716HQHI-SATA: Figure 1. 1 DS-6708HQHI-SATA/DS-6716HQHI-SATA Front Panel Table 1. 1 Indicator Description Indicator Description 1 POWER Lights in green when the device is powered on. 2 STATUS Lights in green when data is being read from or written to HDD. 3 Tx/Rx 1. Does not light when the network is not connected; 2. Blinks in green when the data is transmitting / receiving; 3.
DS-6700HQHI-SATA Series Encoder User Manual Table 1. 2 Interface Description Description 1 VIDEO IN 2 AUDIO IN, RCA Connector 3 AUDIO OUT, RCA Connector 4 LAN Network Interface 5 RS-485 Serial Interface 6 12 VDC Power Input 7 Power Switch 8 ALARM IN and ALARM OUT 9 GND 1.3 Alarm Connections 1.3.1 Alarm Input Connections DS-6700HQHI-SATA supports the open/close relay input as the alarm input mode.
DS-6700HQHI-SATA Series Encoder User Manual selected to NO or NC. Different alarm output connection methods are applied to the AC or DC load. Please refer to the following diagram: Alarm output connections diagram: Figure 1. 6 Alarm Output Connections Please note the different connections of JJ1 shown above. For DC load, JJ1can be safely used both in NC and NO methods, and it is recommended to use within the limit of 12V/1A. For external AC input, JJ1 must be open.
DS-6700HQHI-SATA Series Encoder User Manual Chapter 2 Activation and Initial Network Configuration for the Encoder You are required to activate the encoder first by setting a strong password for it. Activation via Web Browser, Activation via SADP, and Activation via Client Software are all supported. 2.1 Setting the Admin Password via Web Browser Steps: 1. Power on the encoder, and connect the encoder to the network. 2.
DS-6700HQHI-SATA Series Encoder User Manual 5. Click OK to save the password and enter the live view interface. 2.2 Setting Admin Password and Modifying Network Parameters via Client Software The client software is versatile video management software for multiple kinds of devices. Get the client software from the supplied disk or the official website, and install the software according to the prompts. Follow the steps to activate the camera. Steps: 1.
DS-6700HQHI-SATA Series Encoder User Manual Figure 2. 3 Control Panel 3. Check the device status from the device list, and select an inactive device. 4. Click the Activate button to pop up the Activation interface. 5. Create a password and input the password in the password field, and confirm the password.
DS-6700HQHI-SATA Series Encoder User Manual 8. Change the device IP address to the same subnet with your computer by either modifying the IP address manually or checking the checkbox of Enable DHCP. 9. Input the password to activate your IP address modification.
DS-6700HQHI-SATA Series Encoder User Manual Chapter 3 Access to DS-6700HQHI-SATA by WEB Browser The DS-6700HQHI-SATA can also be accessed by WEB Browser for configuration and operation. The supported WEB browsers include: Internet Explorer 6/7/8/9, Firefox 3.5 and above, Chrome 8 and above, Safari 5.0.2 and above, Windows XP SP1 and above (32-bit). Before you start: Before access, you need to configure the network settings of device according to Chapter 3.
DS-6700HQHI-SATA Series Encoder User Manual normal user, the current user account will be locked for30 seconds. 2. On the main page of DS-6700HQHI-SATA, you need to download and install the plug-in. (1) Click on the live view panel by following the hints on the screen. Figure 3. 2 Download and Install Plug-in (2) Click Run or Save on the pop-up warning message box. Figure 3. 3 Run Web Components (3) Click Next on the pop-up Setup dialog box. Figure 3.
DS-6700HQHI-SATA Series Encoder User Manual Figure 3. 5 Install the Web Components 3.2 Main Page After successful login, you will enter the main page automatically. Figure 3. 6 Main Page Description of the live view page: Menu Bar: Enter the Live View, Playback, Log and Configuration page respectively. Device List: Display the connected encoder and its channels. Window-division: 1/4/9/16split screen modes. Live Video Window: Display the live video of the current camera.
DS-6700HQHI-SATA Series Encoder User Manual Chapter 4 Live View Live view shows you the video image getting from the connected camera in real time. After successful login, the system will enter the live view page automatically. 4.1 Starting Live View Steps: 1. In the live view window, select a playing window by clicking the mouse. 2. Double click a camera from the device list to start the live view. Figure 4. 1 Start Live View 3.
DS-6700HQHI-SATA Series Encoder User Manual Icon Description Next page / Audio on/off / Start/Stop two-way audio Switch to full-screen live view mode. Before using two-way audio function or recording with audio, please select the Video Type to Video & Audio on Section Configuring Video Settings. 4.1.1 Main/Sub Stream Live View You can select the main stream or sub stream for live view by clicking the corresponding icon as shown below: Figure 4.
DS-6700HQHI-SATA Series Encoder User Manual 3. Record Settings. 4. Setting the image quality of live view on Section Local Configuration. 5. Setting the saving path for the recorded video files and captured pictures on Section Local Configuration. 6. Setting the OSD text on live video on Section Configuring OSD Settings. 4.2 Capturing the Picture In live view mode, click the button on the toolbar to capture the live pictures.
DS-6700HQHI-SATA Series Encoder User Manual 4.3.3 Operating PTZ Movement In live view mode, you can use the PTZ control buttons to realize pan/tilt/zoom control of the camera lens. There are 8 directional buttons (up, down, left, right, upper left, upper right, bottom left, bottom right) on the display window when the mouse is located in the relative positions. Click on the directional buttons to control the pan/tilt movement. Figure 4.
DS-6700HQHI-SATA Series Encoder User Manual Figure 4. 6 Set a Preset 3. Use the PTZ control buttons to move the lens in the desired position. You can use any of the following commands: • Pan the camera to the right or left. • Tilt the camera up or down. • Zoom in or out. • Refocus the lens. 4. Click the icon to finish the setting of current preset. Up to 256 presets are configurable depending on the PTZ protocol applied.
DS-6700HQHI-SATA Series Encoder User Manual Figure 4. 8 PTZ Linking Please refer to Chapter Configuring and Handling Alarms for the PTZ Linking settings (Remote Configuration>Alarm Settings>Alarm Input>Linkage Method). 4.3.5 Setting/Calling a Patrol Setting a Patrol: 1. 2. In live view mode, click the from the PTZ control area to enter the patrol settings interface. Select a patrol number from the patrol list for setting. Figure 4. 9 Patrol Setting 3.
DS-6700HQHI-SATA Series Encoder User Manual Hold the backspace in the keyboard while changing the number in the text fields of Patrol Duration and Patrol Speed. 5. Click OK to save the path to the current patrol. Figure 4. 11 Added Patrol Path 6. Repeat the above step 3 to 5 to add more patrol paths. You can also click 7. Click to edit the existing patrol path, or click to delete it. to save the patrol settings. Repeat the above steps to configure other patrols.
DS-6700HQHI-SATA Series Encoder User Manual Figure 4. 13 Video Parameters Settings 2. Select the mode according to different light conditions. Four modes are selectable: Standard: in general lighting conditions (default). Indoor: the image is relatively smoother. Outdoor: the image is relatively clearer and sharper. The degree of contrast and saturation is high. Dim Light: the image is smoother than the other three modes. 3.
DS-6700HQHI-SATA Series Encoder User Manual Chapter 5 Device Configuration 5.1 Local Configuration Click Configuration > Local Configuration to enter the Local Configuration interface. Figure 5. 1 Local Configuration Configure the following settings: Protocol Type: Set the protocol type of stream transmission to TCP or UDP. UDP: provides more real-time audio and video streams. TCP: ensures complete deliver of streaming data and better video quality, yet its real-time effect is not so good.
DS-6700HQHI-SATA Series Encoder User Manual You can click the Browse button to change the directory for saving the video files and pictures. 5.2 Device Parameters 5.2.1 Configuring Time Settings Steps: 1. Click Remote Configuration > Device Parameters > Time Settings to enter the Time Settings interface: Figure 5. 2 Time Settings 2. Select the Time Zone. Select the Time Zone that is closest to the device’s location from the drop-down menu. Figure 5. 3 Time Zone Settings 3.
DS-6700HQHI-SATA Series Encoder User Manual NTP Port: Port of NTP server. Interval: The time interval between the two synchronizing actions with NTP server. It can be set from 1 to 10080 minutes. Figure 5. 4 Time Sync by NTP Server If the device is connected to a public network, you should use a NTP server that has a time synchronization function, such as the server at the National Time Center (IP Address: 210.72.145.44).
DS-6700HQHI-SATA Series Encoder User Manual page. Steps: 1. Click Remote Configuration> Device Parameters> Advanced to enter the advanced settings interface. Figure 5. 7 Packet Time of Recording 2. Set the packet time of the recorded file. The packet time can be set from 1to 300 minutes. 3. Click Save to save the settings. 5.3 Network Settings 5.3.1 Configuring TCP/IP Settings Network settings must be properly configured before operating device over network. Steps: 1.
DS-6700HQHI-SATA Series Encoder User Manual The valid value range of MTU is 500 to 1500. 3. If the DHCP server is available, you can click the checkbox of DHCP to automatically obtain an IP address 4. If the DNS server settings are required for some applications (e.g., sending email), you should properly and other network settings from that server. configure the Preferred DNS Server and Alternate DNS Sever here. Figure 5. 9 DNS Server Settings 5. Click the Save button to save the above settings.
DS-6700HQHI-SATA Series Encoder User Manual 5.3.3 Configuring DDNS Settings If your device is set to use PPPoE as its default network connection, you may set Dynamic DNS (DDNS) to be used for network access. Prior registration with your DDNS Provider is required before configuring the system to use DDNS. Steps: 1. Click the Remote Configuration > Network Settings > DDNS Settings to enter the DDNS Settings interface: www.hiddns.com Figure 5. 11 DDNS Settings 2.
DS-6700HQHI-SATA Series Encoder User Manual For the IP Server, You have to apply a static IP, subnet mask, gateway and primary DNS from the ISP. The Server IP should be entered with the static IP address of the PC that runs IPServer software. Figure 5. 13 IPServer Settings • PeanutHull: (1) Enter User Name and Password obtained from the PeanutHull website. (2) Click Save to save the settings. Figure 5. 14 PeanutHull Settings • HiDDNS: (1) Enter the Server Address of the HiDDNS server: www.hiddns.com.
DS-6700HQHI-SATA Series Encoder User Manual 5.3.4 Configuring PPPoE Settings Your device also allows access by Point-to-Point Protocol over Ethernet (PPPoE). Steps: 1. Click the Remote Configuration > Network Settings > PPPoE Settings to enter the PPPoE settings interface: Figure 5. 16 PPPoE Settings 2. Check the PPPoE checkbox to enable this feature. 3. Enter User Name, Password, and Confirm Password for PPPoE access. The User Name and Password should be assigned by your ISP. 4.
DS-6700HQHI-SATA Series Encoder User Manual Figure 5. 17 Email Settings (1) 3. Configure the following Email settings: Authentication (optional): If your mail server requires authentication, check this checkbox to use authentication to log in to this server and enter the login User Name and Password. SMTP Server: The SMTP Server IP address or host name (e.g., smtp.263xmail.com). SMTP Port: The SMTP port. The default TCP/IP port used for SMTP is 25.
DS-6700HQHI-SATA Series Encoder User Manual Figure 5. 18 Email Settings (2) 4. Click Save to save the Email settings. Please refer to the following sections for more information: Configure alarm linking methods with Send Email on Section Configuring Motion Detection, Section Configuring External Alarm Input, Section Configuring Video Loss Alarm, Section Configuring Video Tempering Alarm and Section Handling Exception. 5.3.
DS-6700HQHI-SATA Series Encoder User Manual 3. 2) Enter the IP address of the designated storage server. 3) Click Search and the available NAS or IP SAN disks in this storage server will be listed below. Select and double click on the searched NAS or IP SAN disk from the list to add it, as shown in Figure 6.20. You can also manually add the NAS or IP SAN by entering the IP address of the server and file path in the text filed.
DS-6700HQHI-SATA Series Encoder User Manual Figure 5. 21 Initial Disk 4) Set the property of the added network disk. Select the HDD No., and select the property from the drop-down menu to R/W, Read-only or Redundancy. Figure 5. 22 Set HDD Property Please refer to the User Manual of IP SAN/NAS for the creation of File Path in the network management. Up to 8 NAS disks and 1 IP SAN disk can be connected to the DS-6700HQHI-SATA. 5.3.
DS-6700HQHI-SATA Series Encoder User Manual Figure 5. 23 SNMP Settings (1) 3. Set the SNMP port (default: 161). 4. Click Save to save the above settings. 5.3.8 Configuring UPnPTM Settings Purpose: UPnP™ can permit the device seamlessly discover the presence of other network devices on the network and establish functional network services for data sharing, communications, etc.
DS-6700HQHI-SATA Series Encoder User Manual Figure 5. 24 UPnPTM Settings-Auto 4. Configure the HTTP Port (for access by WEB browser), SDK Port Mapping (for access by client software), RTSP Port and HTTPS Port respectively. 5. You can use the default port No., or change it according to actual requirements. The Ports indicate the port No. for mapping in the router. Click Save to save the settings.
DS-6700HQHI-SATA Series Encoder User Manual Figure 5. 26 HTTPS Settings Task1: Create the self-signed certificate (1) Click the Create button to create the following dialog box. Figure 5. 27 Create Self-signed Certificate (2) Enter the country, host name/IP, validity and other information. (3) Click OK to save the settings. Task2: Create the authorized certificate (1) Click the Create button to create the certificate request.
DS-6700HQHI-SATA Series Encoder User Manual you want to use HTTP mode to log into the device. 5.3.10 Configuring Cloud P2P Purpose: EZVIZ Cloud P2P provides the mobile phone application and as well the service platform page to access and manage your connected DVR, which enables you to get a convenient remote access to the surveillance system. Steps: 1. 2. Click Configuration > Network Settings > Platform Access to enter the Cloud P2P Settings interface. The default server address is dev.hicloudcam.com.
DS-6700HQHI-SATA Series Encoder User Manual Figure 5. 29 Remote Alarm Host 2. Enter Alarm Host IP and Alarm Host Port in the text fields. The Alarm Host IP refers to the IP address of the remote PC on which the CMS (Client Management System) software (e.g., iVMS-4200) is installed, and the Alarm Host Port must be the same as the alarm monitoring port configured in the software (default port is 7200). 3. Click Save to save the setting.
DS-6700HQHI-SATA Series Encoder User Manual Chapter 6 Camera Settings 6.1 Configuring OSD Settings 6.1.1 Configuring Display Settings Purpose: You can customize the camera name and time on the screen. Steps: 1. Click the Remote Configuration >Camera Settings > Display Settings to enter the Display Settings interface: Figure 6. 1 Display Settings 2. Select the camera from the drop-down list. 3. Edit the camera name in the text field of Camera Name. Figure 6. 2 Edit Camera Name 4.
DS-6700HQHI-SATA Series Encoder User Manual Figure 6. 3 Adjust OSD Location 7. If you want to copy the display settings of the current camera to other cameras, spread the Copy to Camera panel and select the camera(s) to copy, or click Select All to select all cameras. Figure 6. 4 Copy to Camera 8. Click OK to validate the above settings. 6.1.2 Configuring Text Overlay Steps: 1. Click the Remote Configuration >Camera Settings > Text Overlay Settings to enter the Text Overlay Settings interface. 2.
DS-6700HQHI-SATA Series Encoder User Manual Figure 6. 5 Text Overlay Settings 6. If you want to copy the text overlay settings of the current camera to other cameras, spread the Copy to Camera panel and select the camera(s) to copy, or click Select All to select all cameras. Figure 6. 6 Text Overlay Settings 7. Click OK to validate the above settings.
DS-6700HQHI-SATA Series Encoder User Manual 6.2 Configuring Video Settings Steps: 1. Click Remote Configuration > Camera Settings >Video Settings to enter the Video Settings interface. Figure 6. 7 Video Settings 2. Select the camera from the drop-down list to configure. 3. Select the Stream Type of the camera to Main Stream (Normal), Main Stream (Event) or Sub Stream.
DS-6700HQHI-SATA Series Encoder User Manual Video Encoding: Select the video encoding standard. When the MJPEG video encoding standard is selected, the frame rate can be set to 1~15fps and the max. bitrate is not configurable. 5. If you want to copy the display settings of the current camera to other cameras, spread the Copy to Camera panel and select the camera(s) to copy, or click Select All to select all cameras. Figure 6. 8 Copy to Camera 6. Click OK to validate the above settings. 6.
DS-6700HQHI-SATA Series Encoder User Manual Figure 6. 9 Motion Detection Settings (4) You can check the checkbox of Enable Dynamic Analysis for Motion. When this feature is enabled, the motion detection triggered frame (green) for the moving targets in the motion detection area will be displayed on the live video. (5) Click the button. Draw motion detection area by clicking and dragging the mouse in the live video image. By default, the full screen motion detection is configured.
DS-6700HQHI-SATA Series Encoder User Manual Figure 6. 10 Motion Detection-Area Settings (8) Click Save button to save the settings. 2. Set the Arming Schedule for Motion Detection Steps: (1) Click the Arming Time tab. Figure 6. 11 Motion Detection-Arming Time Settings (2) Click the Edit button to edit the arming schedule.
DS-6700HQHI-SATA Series Encoder User Manual Figure 6. 12 Motion Detection-Edit Arming Schedule The time of each segment can’t be overlapped. Up to 8 segments can be configured for each day. The Holiday option is available in the Schedule dropdown list when you have enabled holiday schedule in Holiday settings. (3) Choose the day you want to set the arming schedule. (4) Click the button to set the time period for the arming schedule.
DS-6700HQHI-SATA Series Encoder User Manual Steps: (1) Click the Linkage Method tab to enter the setting interface. (2) Select the alarming linkage method(s) including Audible Warning, Notify Surveillance Center, Send Email and Upload to FTP. Audible Warning Trigger an audible beep when an alarm is detected. Notify Surveillance Center Send an exception or alarm signal to remote alarm host when an event occurs. The alarm host refers to the PC installed with Remote Client.
DS-6700HQHI-SATA Series Encoder User Manual Figure 6. 15 Motion Detection-Alarm Output Settings 2) Select one alarm output channel in the Alarm Output drop-down list. 3) The Delay time can be set to 5sec, 10sec, 30sec, 1min, 2min, 5min, 10min or Manual. The Delay refers to the time duration that the alarm output remains in effect after alarm occurs. If you choose Manual, you need to manually disable the alarm output. 4) Click Edit to enter the Edit Schedule Time interface.
DS-6700HQHI-SATA Series Encoder User Manual Figure 6. 17 Motion Detection-Alarm Linked Recording (5) Click OK to save the settings of linking method motion detection. 6.3.4 Configuring External Alarm Input Steps: 1. Click Remote Configuration> Alarm Settings> Alarm Input to enter the Alarm Settings interface. 2. Choose the alarm input number and the Alarm Type. The alarm type can be NO (Normally Open) and NC (Normally Closed). Figure 6. 18 Alarm Input Settings-Arming Time 3.
DS-6700HQHI-SATA Series Encoder User Manual 4. Set the arming schedule for the alarm input. Refer to Step 2 Set the Arming Schedule for Motion Detection 5. Click the Linkage Method tab to set the actions taken for the alarm input. Refer to Step 3 Set the Alarm in Section Configuring Motion Detection. Actions Taken for Motion Detection in Section Configuring Motion Detection. Figure 6. 19 Alarm Input Settings-Linking Method 6.
DS-6700HQHI-SATA Series Encoder User Manual 2. Select the camera to configure the video loss alarm. 3. Check the checkbox of Enable Video Loss. 4. Click Edit to edit the arming schedule for video loss detection. The arming schedule configuration is the same as the Setting of the Arming Schedule for Motion Detection. Please refer to Step 2 Set the Arming Schedule for Motion Detection in Section Configuring Motion Detection. 5.
DS-6700HQHI-SATA Series Encoder User Manual 6.3.7 Handling Exception The exception type can be HDD full, HDD error, network disconnected, IP address conflict, illegal access, video standard mismatch, video signal exception, record/capture exception and video resolution mismatch. When the selected resolution under Remote Configuration > Camera Settings >Video Settings and the actual video input resolution are mismatched, the exception alarm will occur. Please refer to Section Configuring Video Settings.
DS-6700HQHI-SATA Series Encoder User Manual Figure 6. 23 Privacy Mask Settings Interface 4. Click the button. 5. Draw the mask area by clicking and dragging the mouse in the live video image. Up to four privacy mask areas can be configured. 6. When finishing the area setting, click the You can click the 7. button to finish drawing. button to clear all of the areas you set without saving it.
DS-6700HQHI-SATA Series Encoder User Manual Chapter 7 Record Settings Before you start Make sure the Encoder is connected with HDD or network disk, and the HDD or network disk has been initialized for the first time to use. Two record/capture types can be configured: Manual and Scheduled. The following section introduces the configuration of scheduled record/capture. 7.1 Configuring Holiday Settings Purpose: You may want to have different plan for recording on holiday.
DS-6700HQHI-SATA Series Encoder User Manual Figure 7. 2 Edit Holiday 3. You can check the finished holiday settings on the list. 4. Repeat the same steps to edit other holidays. Up to 32 holidays can be configured. Figure 9.1 List of Holidays The Holiday option is available in the Schedule dropdown list when you have enabled holiday schedule in Holiday settings. 7.2 Configuring Scheduled Record Steps: 1.
DS-6700HQHI-SATA Series Encoder User Manual 5. Click Edit to enter the Edit Schedule interface. 6. Choose the day in a week to configure scheduled record/capture. Figure 7. 4 Edit Schedule 1) Configure All Day or Customized period record/capture: If you want to configure the all-day record, please check the All Day checkbox. If you want to record/capture in different time sections, check the Custom checkbox. Set the Start Time and End Time of each period.
DS-6700HQHI-SATA Series Encoder User Manual Besides configuring the record schedule, you have to configure the settings on the Motion Detection and Alarm Input Settings interfaces. Record Triggered by Motion | Alarm If you select Motion | Alarm, the video will be recorded when the alarm is triggered or the motion is detected. Besides configuring the record/capture schedule, you have to configure the settings on the Motion Detection and Alarm Input Settings interfaces.
DS-6700HQHI-SATA Series Encoder User Manual Figure 7. 6 Copy to Camera 9. Click Save to validate the above settings.
DS-6700HQHI-SATA Series Encoder User Manual Chapter 8 Playback Purpose: The recorded video files can be remotely played back through the WEB browser. Steps: 1. Click Playback on the menu bar to enter playback interface: Figure 8. 1 Playback Page 2. Click the camera from the device list for playback. 3. Select the date from the calendar and click Search. Figure 8. 2 Select Date for Search 4. Click the button to play the video file searched on the current date.
DS-6700HQHI-SATA Series Encoder User Manual Figure 8. 3 Playback Page Use the buttons on the toolbar to operate in playback mode. 5. Figure 8. 4 Playback Toolbar Table 8. 1 Description of Toolbar Button / / 6.
DS-6700HQHI-SATA Series Encoder User Manual Chapter 9 Managing User Accounts Click Remote Configuration>Remote Configuration>User Management to enter the User Information interface: Figure 9. 1 User Information Interface The admin user is allowed to create normal users. And up to 31 users can be created. . 9.1 Adding a User Steps: 1. Click Add to enter the Add user interface. 2. Edit the User Name. 3. Select the Level to Operator or User. 4. Set the Password, and confirm the same password.
DS-6700HQHI-SATA Series Encoder User Manual Figure 9. 2 Add a User Different user level is given different permissions: • Operator: The Operator user level has permission of Local Log Search in Local Configuration, Remote Log Search and Two-way Audio in Remote Configuration and all operating permission in Camera Configuration.
DS-6700HQHI-SATA Series Encoder User Manual Figure 9. 5 Modify a User 3. Modify the User Name, Password and then select User type. You are highly recommended to use the strong password. 4. Configure the user permission for the user, including the Basic Permission and Camera Operation. 5. Click OK to finish the user modification. You need the admin password to modify the admin user. 9.3 Deleting a User Steps: 1. Select a user account from the list on the User Information interface to be deleted.
DS-6700HQHI-SATA Series Encoder User Manual Chapter 10 Log Search and Maintenance 10.1 Log Search Purpose The operation, alarm, exception and information of the device can be stored in log files, which can be viewed and exported at any time. Before you start The Log function can be realized only when the Encoder is connected with HDD or network disk. And make sure the HDD or network disk has been initialized for the first time to use. Please refer to Section Adding Network Disk for details. Steps: 1.
DS-6700HQHI-SATA Series Encoder User Manual 5. You can click the button to save the searched log files to local directory. 10.2 Viewing Device Information Click Remote Configuration > Device Parameters > Device Information to enter the Device Information interface of the encoder: Figure 10. 2 1 Device Information You can edit the Device Name and Device No., and view the device information, including Model, Serial No.
DS-6700HQHI-SATA Series Encoder User Manual Figure 10. 3 Maintenance Page 10.3.1 Restarting the Device On the Maintenance> Reboot interface, click Reboot to enter the following message box: Figure 10. 4 Reboot the Device Click OK to reboot the device or Cancel to cancel the operation. 10.3.2 Restoring Default Settings On the Maintenance > Default interface, click Restore or Default to restore device parameters to the factory settings. Figure 10.
DS-6700HQHI-SATA Series Encoder User Manual address, subnet mask, gateway and port. By selecting the Default button, the device restores the default settings for all parameters. On the pop-up message box, click OK to restore and reboot the device to validate the settings. Figure 10. 6 Pop-up Message Box 10.3.
DS-6700HQHI-SATA Series Encoder User Manual Chapter 11 Specification Table 11. 1 Specification Model Video Input DS-6708HQHI-SATA DS-6716HQHI-SATA 8-ch 16-ch BNC interface Video/Audio Input/Output Video/Audio Encoding HDTVI Video Audio Input Audio Output 1-ch, RCA (Linear, 1 KΩ) Video Compression Audio Compression Frame Rate Video Bitrate Audio Bitrate Stream Type Main Stream H.264 G.
DS-6700HQHI-SATA Series Encoder User Manual Chapter 12 FAQ Why cannot ping the Encoder? Please refer to Chapter 3 to configure the device’s IP being in the same segment as your PC, and check the cable and switch. Why the transparent channel has been set, but the encoder still cannot receive data? 1. Check if RS-232 has been set as transparent channel first. 2. Check the connection of encoder. Why cannot add encoder with software? 1. Check the encoder IP. 2. Make sure the cable is connected. 3.