
User Manual
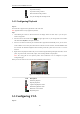
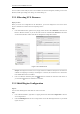
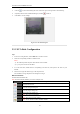
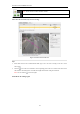
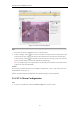
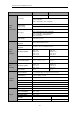
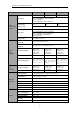
Table Of Contents
- CHAPTER 1 Introduction
- CHAPTER 2 Panels and Connections
- CHAPTER 3 Initial Network Parameters Configuration
- CHAPTER 4 Decoder Configuration and Operation by Web Browser
- 4.1 Decoding Operation
- 4.1.1 Configuring Decoded Video Display
- 4.1.2 Configuring Dynamic Decoding
- 4.1.3 Configuring Cycle Decoding
- 4.1.4 Configuring Video Wall Display
- 4.1.5 Enabling/Disabling the Decoding Channel
- 4.1.6 Configuring Picture Overlay
- 4.1.7 Checking the Connection Status
- 4.1.8 Checking the Decoding Channel Status
- 4.1.9 Checking the Display Channel Status
- 4.1.10 Configuring Transparent Channel
- 4.2 Decoder Configuration
- 4.2.1 Checking Device Information
- 4.2.2 Configuring Time Settings
- 4.2.3 Configuring Basic Network Settings
- 4.2.4 Configuring DDNS Settings
- 4.2.5 Configuring RS-485/RS-232 Serial Port
- 4.2.6 Configuring Alarm Input / Output Settings
- 4.2.7 Configuring Arming Time
- 4.2.8 Managing User Account
- 4.2.9 Importing/Exporting Parameters
- 4.3 Configuring Remote Playback
- 4.4 Switching Working Mode
- 4.5 Rebooting, Upgrading and Restoring the Default Settings for the Decoder
- 4.1 Decoding Operation
- CHAPTER 5 Decoder Configuration and Operation by Client Software
- CHAPTER 6 Appendix

User Manual of DS-6400HDI-T Decoder
50
Stop all the decoding
Stop all the roaming windows
Refresh all the decoding windows
Set cycle decoding and switching interval
5.4.3 Configuring Playback
Purpose:
The record file is supported to be played back on the video wall.
Note: playback function is only supported by decoder.
Steps:
1. Click-and-drag the camera on the left-side list to the display window of video wall, or you can open a
window if supported.
2. Move the mouse to the window and click in the upper-right corner. Or you can right-click on the window
and select Go to Playback in the right-click menu.
3. If there is record file of current day, the record file will be played back automatically. If not, you can set the
search condition on the search panel which shows in the left area of the interface, and click Search to find
the record file. For detailed configuration about searching record files, please refer to Section 3.2.1 Normal
Playback.
4. Right-click on the playback window and you can control the playback through the right-click menu, such as
pause, stop, fast forward, slow forward, capture, start recording and full-screen playback.
Note: The saving path for the captured pictures and recorded files can be configured on System
Configuration page.
When you move the mouse to the screen, the icons will display as shown below.
Figure 5.13 Playback the Video File
Icon
Description
Pause the playback
Stop the playback
Capture the playback video
Record the playback video
Back to live view mode
Playback speed.
5.5 Configuring VCA
Purpose: