
User Manual
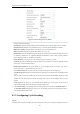
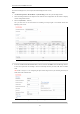
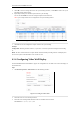
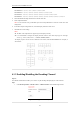
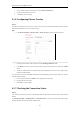
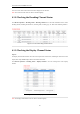
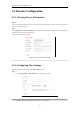


Table Of Contents
- CHAPTER 1 Introduction
- CHAPTER 2 Panels and Connections
- CHAPTER 3 Initial Network Parameters Configuration
- CHAPTER 4 Decoder Configuration and Operation by Web Browser
- 4.1 Decoding Operation
- 4.1.1 Configuring Decoded Video Display
- 4.1.2 Configuring Dynamic Decoding
- 4.1.3 Configuring Cycle Decoding
- 4.1.4 Configuring Video Wall Display
- 4.1.5 Enabling/Disabling the Decoding Channel
- 4.1.6 Configuring Picture Overlay
- 4.1.7 Checking the Connection Status
- 4.1.8 Checking the Decoding Channel Status
- 4.1.9 Checking the Display Channel Status
- 4.1.10 Configuring Transparent Channel
- 4.2 Decoder Configuration
- 4.2.1 Checking Device Information
- 4.2.2 Configuring Time Settings
- 4.2.3 Configuring Basic Network Settings
- 4.2.4 Configuring DDNS Settings
- 4.2.5 Configuring RS-485/RS-232 Serial Port
- 4.2.6 Configuring Alarm Input / Output Settings
- 4.2.7 Configuring Arming Time
- 4.2.8 Managing User Account
- 4.2.9 Importing/Exporting Parameters
- 4.3 Configuring Remote Playback
- 4.4 Switching Working Mode
- 4.5 Rebooting, Upgrading and Restoring the Default Settings for the Decoder
- 4.1 Decoding Operation
- CHAPTER 5 Decoder Configuration and Operation by Client Software
- CHAPTER 6 Appendix

User Manual of DS-6400HDI-T Decoder
23
DS-6408HDI-T: 1×2, 1×3, 1×4, 2×1, 2×2, 2×3, 3×2, 2×4, 4×2.
DS-6410HDI-T: 1×2, 1×3, 1×4, 2×1, 2×2, 2×3, 2×4, 2×5, 3×2, 3×3, 4×2, 5×2.
DS-6412HDI-T: 1×2, 1×3, 1×4, 2×1, 2×2, 2×3, 2×4, 2×5, 3×2, 3×3, 4×2, 5×2, 3×4, 4×3.
DS-6416HDI-T: 1×2, 1×3, 1×4, 2×1, 2×2, 2×3, 2×4, 2×5, 3×2, 3×3, 4×2, 5×2, 3×4, 4×3, 5×3, 3×5, 4×4.
4. Select the Related Decoding Channel for the selected video wall.
5. Set the Output Resolution.
Note: You can select the NOT_AVAILABLE option in the Output Resolution to clear the current video wall
configuration.
6. In the Video Output Configuration area, select the Display Channel for each screen.
7. Click Save to save the settings.
Notes:
The BNC video output does not support large screen display currently.
It is recommended to configure the display channels with the same video output type for each large
screen, e.g., VGA1, VGA2, VGA3…; or HDMI1, HDMI2, HDMI3….
The display sequence of sub-screens in different screen modes (with DS-6404/6408HDI-T for example) is
shown below:
Figure 4.13 Multi-screen Video Wall Display
4.1.5 Enabling/Disabling the Decoding Channel
Purpose:
The Channel On/Off function enables you to start or stop the decoding and displaying for certain channels.
Steps:
1. Click Decode Operation > Decode Control > Channel On/Off to enter the following interface:
Figure 4.14 Configure Channel On/Off