DS-2TD2137-7P Thermal Network Camera User Manual
DS-2TD2137-7P Thermal Network Camera User Manual © 2021 Hangzhou Hikvision Digital Technology Co., Ltd. All rights reserved. About this Manual The Manual includes instructions for using and managing the Product. Pictures, charts, images, and all other information hereinafter are for description and explanation only. The information contained in the Manual is subject to change, without notice, due to firmware updates or other reasons.
DS-2TD2137-7P Thermal Network Camera User Manual Symbol Conventions The symbols that may be found in this document are defined as follows. Symbol Description Indicates a hazardous situation which, if not avoided, will or could result in death or DANGER serious injury. Indicates a potentially hazardous situation which, if not avoided, could result in CAUTION equipment damage, data loss, performance degradation, or unexpected results.
DS-2TD2137-7P Thermal Network Camera User Manual Maintenance • If the product does not work properly, contact your dealer or the nearest service center. We shall not assume any responsibility for problems caused by unauthorized repair or maintenance. • A few device components (e.g., electrolytic capacitor) require regular replacement. The average lifespan varies, so periodic checking is recommended. Contact your dealer for details.
DS-2TD2137-7P Thermal Network Camera User Manual Contents Chapter 1 Overview ........................................................................................................................................ 10 1.1 Brief Description................................................................................................................................. 10 1.2 Functions............................................................................................................................
DS-2TD2137-7P Thermal Network Camera User Manual 5.4 Set Rules ............................................................................................................................................. 23 5.5 Advanced Configuration .................................................................................................................... 24 5.6 Set Global Size Filter...........................................................................................................................
DS-2TD2137-7P Thermal Network Camera User Manual Chapter 9 Video and Audio ............................................................................................................................ 39 9.1 9.2 Video Settings .................................................................................................................................... 39 9.1.1 Stream Type ......................................................................................................................... 39 9.
DS-2TD2137-7P Thermal Network Camera User Manual 10.2 10.3 10.1.3 Set FTP ................................................................................................................................. 49 10.1.4 Set Cloud Storage ................................................................................................................ 49 Video Recording ................................................................................................................................. 50 10.2.
DS-2TD2137-7P Thermal Network Camera User Manual 12.6 Restore and Default ........................................................................................................................... 62 12.7 Upgrade .............................................................................................................................................. 62 12.8 View Open Source Software License ................................................................................................. 63 12.
DS-2TD2137-7P Thermal Network Camera User Manual Chapter 1 Overview Brief Description Hikvision’s Thermal network bullet camera equipped with a built-in GPU that supports an intelligent behavior analysis algorithm can realize high-precision VCA detection and real-time alarms. It is applied to perimeter defense and fire-prevention purposes in critical infrastructures such as communities, villas, construction sites, factories, automobile dealerships, etc.
DS-2TD2137-7P Thermal Network Camera User Manual Chapter 2 Device Activation and Accessing To protect the security and privacy of the user account and data, set a login password to activate the device when accessing the device via a network. NOTE: See the software client user manual for details about client software activation. Activate the Device via SADP Search and activate online devices via SADP software. Before You Start Access www.hikvision.com to get the SADP software to install. Steps 1.
DS-2TD2137-7P Thermal Network Camera User Manual 3. Input 192.168.1.64 in the browser. 4. Set device activation password. STRONG PASSWORD RECOMMENDED − We highly recommend that you create a strong password of your own choosing (using a minimum of eight characters, including at least three of the following categories: upper case letters, lower case letters, numbers, and special characters) in order to increase the security of your product. We also recommend that you reset your password regularly.
DS-2TD2137-7P Thermal Network Camera User Manual Chapter 3 Temperature Measurement When you enable this function, the device measures the actual temperature of the scene. It alarms when temperature exceeds the temperature threshold value. 3.1 Notice This section introduces configuring the temperature measurement function. • The target surface should be as vertical to the optical axis as possible. It is recommended that the angle of oblique image plane should be less than 45°.
DS-2TD2137-7P Thermal Network Camera User Manual Automatic Thermography Configure the temperature measurement parameters and temperature measurement rules.The device can measure the actual temperature and output alarms when temperature exceeds the alarm threshold value. Set Thermography Parameters Configure the temperature measurement parameters. Before You Start Go to Configuration → System → Maintenance → VCA Resource Type, select Temperature Measurement+Behavior Analysis. Steps 1.
DS-2TD2137-7P Thermal Network Camera User Manual • Version: View the version of the current algorithm. 4. Click Save. Set Normal Mode This function measures the temperature of the whole scene and alarm. Steps 1. Go to Configuration → Temperature Measurement → Basic Settings, and check Enable Temperature Measurement. 2. Refer to Set Thermography Parameters to set the parameters. 3. Go to Configuration → Temperature Measurement → Advanced Settings, and select Normal. 4.
DS-2TD2137-7P Thermal Network Camera User Manual position to be measured is. • Point: Refer to Point Thermography for detailed configuration. • Line: Refer to Line Thermography for detailed configuration. • Area: Refer to Area Thermography for detailed configuration. 3. Click and set the Alarm Rule. • Alarm Temperature and Pre-Alarm Temperature: Set the alarm temperature and pre-alarm temperature. E.g.
DS-2TD2137-7P Thermal Network Camera User Manual Area Thermography Configure the temperature measurement rule and monitor the maximum temperature of the area. Steps 1. Click and drag the mouse in live view to draw the area, and right click to finish drawing. 2. Click and move the area to adjust the position. 3. Drag the corners of the area to adjust the size and shape. 4. Go to the Live View interface to view the maximum temperature and rule of the area in the thermal channel.
DS-2TD2137-7P Thermal Network Camera User Manual Chapter 4 Fire Source Detection The device will trigger and upload alarms when it detects a fire source or smoking. Fire source detection includes fire source detection and smoking detection. It is applied for fireprevention purposes in scenic regions, foresst, tunnels, etc. Fire Detection Configure the fire source detection parameters. If a fire source is detected, the alarm actions will trigger.
DS-2TD2137-7P Thermal Network Camera User Manual • Dynamic Fire: Detect the fire source in the scene. • Sensitivity: The sensitivity of fire detection. The bigger the value, the more easily the fire source can be detected, and the false rate is higher. NOTE: When VCA Resource Type is selected as Temperature Measurement+Behavior Analysis, only smoking detection is supported. When VCA Resource Type is selected as Temperature Measurement+Fire Detection, both detection modes are supported. 6.
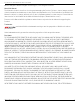
DS-2TD2137-7P Thermal Network Camera User Manual Chapter 5 Behavior Analysis The behavior analysis function detects whether any target breaks the VCA rules. The optical camera will track the target or the device will alarm when the VCA rule is triggered. Flow Chart of Behavior Analysis The process of configuraing the behavior analysis function is decribed below. Figure 2, Behavior Analysis Configuration Flow Chart Set VCA Parameters Steps 1. Go to Configuration → VCA → Basic Settings.
DS-2TD2137-7P Thermal Network Camera User Manual • Target Marking Color: The frame color of human is shown as orange, the frame color of vehicle is shown as purple. • Display Target Info.on Alarm Picture: Select to display the target information on the alarm picture. • Display Rule Info.on Alarm Picture: Select to display the rule information on the alarm picture. • Snapshot Settings: Select to upload the picture to the surveillance center when the VCA alarm occurs.
DS-2TD2137-7P Thermal Network Camera User Manual NOTE: After auto calibration, refer to Verify the Calibration Result to verify if the calibration is successful. Set manual calibration if the auto calibration failed or the verified result are bad. Result After calibration, the height and angle of camera will be shown in live view. Calibrate Manually Steps 1. Go to Configuration → VCA → Camera Calibration. 2. Check Manual Calibration. 3. Click Fig 1.
DS-2TD2137-7P Thermal Network Camera User Manual 3. Move the line to the target, then click NOTE: 4. Click to caculate the length. Compare the calculated line length to the actual length to verify the calibration settings. to exit. NOTE: Verify not only the person, but also other objects appearing in the view such as car, street lamp, etc. Set Rules The device can detect if any target breaks the VCA rules.
DS-2TD2137-7P Thermal Network Camera User Manual • When the rule type is selected as Intrusion, Region Entrance, Region Entrance, click area in live view. Right click the mouse to finish drawing. • Duration: The device performs behavior analysis when the target stays in the detection area for more than the setting value. NOTE: to draw an Draw three segments of the rule from near to far to cover all of the detection area. 6.
DS-2TD2137-7P Thermal Network Camera User Manual • Single Alarm: The system sends alarm only once for one target triggering. Otherwise, the alarm will trigger continuously until the target disappears. • Scene Modes: The scene mode is set to be General by default. Select Distant View when you are far from the targets. Select Indoor when you are indoor. Restore Parameters • Restore Default: Click Restore to restore the parameters to the default.
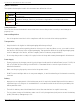
DS-2TD2137-7P Thermal Network Camera User Manual Chapter 6 Event and Alarm This part introduces events configuration. The device takes certain response to a triggered alarm. Set Motion Detection It helps to detect the moving objects in the detection region and trigger the linkage actions. Steps 1. Go to Configuration → Event → Basic Event → Motion Detection. 2. Check Enable Motion Detection. 3. Optional: Highlight to display the moving object in the image in green.
DS-2TD2137-7P Thermal Network Camera User Manual Figure 3, Set Rules • Stop Drawing: Stop drawing one area. • Clear All: Clear all the areas. 4. Optional: You can set the parameters of multiple areas by repeating the above steps. Expert Mode You can configure the motion detection parameters of day/night switch according to the actual needs. Steps 1. Select expert mode in Configuration. 2. Set parameters of expert mode. • • Day/Night Switch OFF: Day/night switch is disabled.
DS-2TD2137-7P Thermal Network Camera User Manual Figure 4, Set Rules • Stop Drawing: Finish drawing one area. • Clear All: Delete all the areas. 4. Optional: Repeat the above steps to set multiple areas. Set Video Tampering Alarm When the configured area is covered and cannot be monitored normally, the alarm is triggered and the device takes certain alarm response actions. Steps 1. Go to Configuration → Event → Basic Event → Video Tampering. 2. Check Enable. 3. Set the Sensitivity.
DS-2TD2137-7P Thermal Network Camera User Manual Figure 5, Set Video Tampering Area 5. Refer to Set Arming Schedule for setting scheduled time. Refer to Linkage Method Settings for setting linkage method. 6. Click Save. Set Alarm Input Alarm signal from the external device triggers the corresponding actions of the current device. Before You Start Make sure the external alarm device is connected. See Quick Start Guide for cable connections. Steps 1. Go to Configuration → Event → Basic Event → Alarm Input.
DS-2TD2137-7P Thermal Network Camera User Manual Set Exception Alarm Exceptions such as network disconnection can trigger the device to take corresponding action. Steps 1. Go to Configuration → Event → Basic Event → Exception. 2. Select Exception Type.
DS-2TD2137-7P Thermal Network Camera User Manual 3. Refer to Set Arming Schedule for setting scheduled time. Refer to Linkage Method Settings for setting linkage methods. 4. Click Save. NOTE: The function varies by model.
DS-2TD2137-7P Thermal Network Camera User Manual Chapter 7 Arming Schedule and Alarm Linkage Arming schedule is a customized time period during which the device performs certain tasks. Alarm linkage is the response to the detected incident or target during the scheduled time. Set Arming Schedule Set the valid time of the device tasks. Steps 1. Click Arming Schedule. 2. Drag the time bar to draw desired valid time. NOTE: Up to eight periods can be configured for one day. 3. Adjust the time period.
DS-2TD2137-7P Thermal Network Camera User Manual Manual Alarm You can trigger an alarm output manually. Steps 1. Set the manual alarm parameters. • Alarm Output No.: Select the alarm output no. according to the alarm interface connected to the external alarm device. • Alarm Name: Enter a custom name for the alarm output. • Delay: Select Manual. 2. Click Manual Alarm to enable manual alarm output. 3. Optional: Click Clear Alarm to disable manual alarm output.
DS-2TD2137-7P Thermal Network Camera User Manual when an alarm event is detected. For e-mail settings, refer to Set Email. Set Email When the e-mail is configured and Send Email is enabled as a linkage method, the device sends an e-mail notification to all designated receivers if an alarm event is detected. Before You Start Set the DNS server before using the Email function. Go to Configuration → Network → Basic Settings → TCP/IP for DNS settings. Steps 1.
DS-2TD2137-7P Thermal Network Camera User Manual Trigger Recording Check Trigger Recording, and the device records the video about the detected alarm event. For recording settings, refer to Video Recording and Picture Capture Set Audible Alarm Output For devices that support audible warning as a linkage method, options are open to configure audible alarm parameters. Steps NOTE: The function is supported only by certain camera models. 1.
DS-2TD2137-7P Thermal Network Camera User Manual Chapter 8 Live View This section introduces the live view parameters, function icons, and transmission parameters settings. Live View Parameters Window Proportion • refers to window size 16:9 • refers to window size 4:3 • refers to original window size • refers to self-adaptive window size Live View Stream Type Select desored live view stream type. For details about the stream type selection, refer to Stream Type.
DS-2TD2137-7P Thermal Network Camera User Manual NOTE: This function is supported only by certain models. Lens Parameters Adjustment This is used to adjust the lens focus, zoom, and iris. • Zoom • • Click Click , and the lens zooms out. Focus Click , then the lens focuses far, and distant objects are clear. Click , then the lens focuses near, and nearby object are clear. PTZ Speed • , and the lens zooms in. Slide to adjust the pan/tilt movement speed.
DS-2TD2137-7P Thermal Network Camera User Manual Set Transmission Parameters The live view image may display abnormally according to the network conditions. In different network environments, adjust the transmission parameters to solve the problem. Steps 1. Go to Configuration → Local. 2. Set the transmission parameters as required. • Protocol TCP: TCP ensures complete delivery of streaming data and better video quality, yet realtime transmission will be affected.
DS-2TD2137-7P Thermal Network Camera User Manual Chapter 9 Video and Audio This section introduces configuring video and audio parameters. Video Settings This introduces setting video parameters such as stream type, video encoding, and resolution. Go to setting page: Configuration → Video/Audio → Video. Stream Type For devices that support more than one stream, you can specify parameters for each stream type. • Main Stream: The best stream performance the device supports.
DS-2TD2137-7P Thermal Network Camera User Manual Frame Rate Frame rate is the frequency at which the video stream is updated, measured in frames per second (fps). A higher frame rate is advantageous when there is movement in the video stream, as it maintains image quality throughout. Note that higher frame rate requires higher bandwidth and larger storage space. Video Encoding This is the compression standard the device adopts for video encoding. NOTE: Available compression standards vary by model. • H.
DS-2TD2137-7P Thermal Network Camera User Manual Display VCA Info VCA information can be displayed by Player and Video. • Player: Player means the VCA info can be displayed by the dedicated player provided by the manufacturer. • Video: Video means the VCA info can be displayed by any general video player. Audio Settings It is a function to set audio parameters such as audio encoding and environment noise filtering. Go to the audio settings page: Configuration → Video/Audio → Audio.
DS-2TD2137-7P Thermal Network Camera User Manual Set ROI ROI (Region of Interest) encoding assigns more encoding resource to the region of interest to increase the quality of the ROI, whereas the background information is less focused. Before You Start Check the video coding type. ROI is supported when the video coding type is H.264 or H.265. Steps 1. Go to Configuration → Video/Audio → ROI. 2. Check Enable. 3. Select Stream Type. 4. Select Region No.in Fixed Region to draw ROI region. 1) Click Drawing.
DS-2TD2137-7P Thermal Network Camera User Manual NOTE: • It is a normal phenomenon that short video freezing might occur during the process of Background Correction and Manual Correction. Thermal AGC Mode: Choose the AGC mode according to different scenes to balance and improve the image quality. Histogram: Choose for scenes with obvious WDR and high temperature difference, to improve image contrast and enhance the image (e.g., scene contains both indoor and outdoor scenes).
DS-2TD2137-7P Thermal Network Camera User Manual Figure 6, Set the Target Temperature and Color • Above (be colored): When high temperature targets need to be in color, set the high temperature color. Targets above the setting temperature will display in the setting color. • Between (be colored): When interval temperature targets need to be in color, set the interval temperature color. Targets between the minimum and the maximum temperatures will display in the setting’s color.
DS-2TD2137-7P Thermal Network Camera User Manual DDE Digital Detail Enhancement adjusts the image details. OFF and Normal modes are selectable. • OFF: Disable this function. • Normal: Set the DDE level to control the image details. The higher the level, the more details show, but the higher the noise. Brightness Sudden Change When the target and the background brightness hugely differ (the temperature difference of target and background is huge), the system reduces the difference for enhanced viewing.
DS-2TD2137-7P Thermal Network Camera User Manual Scene Mode There are several sets of image parameters predefined for different installation environments. Select a scene according to the actual installation environment to speed up the display settings. OSD You can customize OSD (On-screen Display) information such as device name, time/date, font,color, and text overlay displayed on video stream. Go to OSD setting page: Configuration → Image → OSD Settings.
DS-2TD2137-7P Thermal Network Camera User Manual Steps 1. Go to picture overlay setting page: Configuration → Image → Picture Overlay. 2. Click Browse to select a picture, and click Upload. NOTE: The picture with a red rectangle will appear in live view after successfully uploading. 3. Check Enable Picture Overlay. 4. Drag the picture to adjust its position. 5. Click Save.
DS-2TD2137-7P Thermal Network Camera User Manual Chapter 10 Video Recording and Picture Capture This section introduces capturing video clips and snapshots, playback, and downloading captured files. Storage Settings This part introduces configuring several common storage paths. Set Memory Card If you choose to store the files to a memory card, insert and format the memory card in advance. Before You Start Insert the memory card into the camera.
DS-2TD2137-7P Thermal Network Camera User Manual Set FTP You can configure the FTP server to save images that are captured by events or a timed snapshot task. Before You Start Get the FTP server address first. Steps 1. Go to Configuration → Network → Advanced Settings → FTP. 2. Configure FTP settings. • Server Address and Port: The FTP server address and corresponding port. • User Name and Password: The FTP user should have the permission to upload pictures.
DS-2TD2137-7P Thermal Network Camera User Manual • Picture Storage Pool ID: The ID of the picture storage region in the cloud storage server. Make sure the storage pool ID and the storage region ID are the same. 4. Click Test to test the configured settings. 5. Click Save. Video Recording This section introduces manual and scheduled recording, playback, and downloading recorded files. Record Automatically This function can record video automatically during configured time periods.
DS-2TD2137-7P Thermal Network Camera User Manual • Post-record: The time period you set to stop recording after the scheduled time. • Stream Type: When you select a stream type with a higher bitrate, the actual time of the pre-record and post-record may be less than the set value. NOTE: Select the stream type for recording. 6. Click Save. Record Manually Steps 1. Go to Configuration → Local. 2. Set the Record File Size and saving path to for recorded files. 3. Click Save. 4.
DS-2TD2137-7P Thermal Network Camera User Manual Capture Configuration The device can capture the pictures manually or automatically and save them in the configured saving path. You can view and download the snapshots. Capture Automatically This function can capture pictures automatically during configured time periods. Before You Start If event-triggered capture is required, configure related linkage methods in event settings. Refer to Event and Alarm for event settings. Steps 1.
DS-2TD2137-7P Thermal Network Camera User Manual 2. Set search condition and click Search. NOTE: Matching pictures show in the file list. 3. Select the pictures, then click Download to download them. NOTE: Go to Configuration → Local, click Save snapshots when playback to change the saving path of pictures.
DS-2TD2137-7P Thermal Network Camera User Manual Chapter 11 Network Settings TCP/IP TCP/IP settings must be properly configured before you can operate the device over a network. IPv4 and IPv6 are both supported. Both versions can be configured simultaneously without conflicting with each other. Go to Configuration → Basic Configuration → Network → TCP/IP for parameter settings. • NIC Type: Select a NIC (Network Interface Card) type according to your network condition.
DS-2TD2137-7P Thermal Network Camera User Manual Port The device port can be modified if the device cannot access the network due to port conflicts. CAUTION: Do not modify the default port parameters at will, otherwise the device may be unaccessible. Go to Configuration → Network → Basic Settings → Port for port settings. • HTTP Port: The port that accesses the device through a browser. Enter the port no. after the IP address. For example, if the HTTP port is modified to 81, enter http://192.168.1.
DS-2TD2137-7P Thermal Network Camera User Manual Set Manual Port Mapping Steps 1. Check Enable UPnP™, and choose a friendly name for the device, or use the default name. 2. Set the port mapping mode to Manual, and set the external port to be the same as the internal port. 3. Click Save. What To Do next Go to the router port mapping settings interface and set the port number and IP address to be the same as those on the device. For more information, refer to the router user manual.
DS-2TD2137-7P Thermal Network Camera User Manual Access to Device via Domain Name You can use the Dynamic DNS (DDNS) for network access.The dynamic IP address of the device can be mapped to a domain name resolution server to realize network access via a domain name. Before You Start Registration on the DDNS server is required before configuring the DDNS settings of the device. Steps 1. Refer to TCP/IP to set DNS parameters. 2. Go to the DDNS settings page: Configuration → Network → Basic Settings → DDNS.
DS-2TD2137-7P Thermal Network Camera User Manual 4. Click Save. 5. Access the device. • By Browser: Enter the WAN dynamic IP address in the browser address bar to access the device. • By Client Software: Add the WAN dynamic IP address to the client software. Refer to the client manual for details. NOTE: The obtained IP address is dynamically assigned via PPPoE, so the IP address always changes after rebooting the camera.
DS-2TD2137-7P Thermal Network Camera User Manual Steps 1. Run SADP software. 2. Select a camera, and enter the Modify Network Parameters page. 3. Check Enable Hik-Connect. 4. Create a verification code or change the old verification code. NOTE: The verification code is required when you add the camera to Hik-Connect service. 5. Click and read “Terms of Service” and “Privacy Policy.” 6. Confirm the settings.
DS-2TD2137-7P Thermal Network Camera User Manual Set ONVIF If you need to access to the device through ONVIF protocol, you can configure the ONVIF user to enhance the network security. Steps 1. Go to Configuration → Network → Advanced Settings → Integration Protocol. 2. Check Enable ONVIF. 3. Click Add to configure the ONVIF user. • Delete: Delete the selected ONVIF user. • Modify: Modify the selected ONVIF user. 4. Click Save. 5. Optional: Repeat the steps above to add more ONVIF users.
DS-2TD2137-7P Thermal Network Camera User Manual Chapter 12 System and Security This section introduces system maintenance, system settings, and security management. It also explains how to configure relevant parameters. View Device Information You can view device information such as Device No., Model, Serial No., and Firmware Version. Enter Configuration → System → System Settings → Basic Information to view the device information. Search and Manage Log Log helps locate and troubleshoot problems.
DS-2TD2137-7P Thermal Network Camera User Manual Export Diagnose Information Diagnose information includes running log, system information, and hardware information. Go to Configuration → System → Maintenance → Upgrade & Maintenance, and click Diagnose Information to export diagnose information of the device. Reboot You can reboot the device via a browser. Go to Configuration → System → Maintenance → Upgrade & Maintenance, and click Reboot.
DS-2TD2137-7P Thermal Network Camera User Manual View Open Source Software License Go to Configuration → System → System Settings → About Device, and click View Licenses. Time and Date You can configure time and date of the device by configuring time zone, time synchronization, and Daylight Saving Time (DST). Synchronize Time Manually Steps 1. Go to Configuration → System → System Settings → Time Settings. 2. Select Time Zone. 3. Click Manual Time Sync. 4. Choose one time synchronization method.
DS-2TD2137-7P Thermal Network Camera User Manual Set DST If the region where the device is located adopts Daylight Saving Time (DST), you can set this function. Steps 1. Go to Configuration → System → System Settings → DST. 2. Check Enable DST. 3. Select Start Time, End Time, and DST Bias. 4. Click Save. Set RS-232 RS-232 can be used to debug the device or access a peripheral device. RS-232 can realize communication between the device and computer or terminal when the communication distance is short.
DS-2TD2137-7P Thermal Network Camera User Manual Steps 1. Go to Configuration → System → System Settings → Unit Settings. 2. Check Use Same Unit. 3. Set the temperature unit and distance unit. 4. Click Save. Security You can improve system security by setting security parameters. Authentication You can improve network access security by setting RTSP and Web authentication. Go to Configuration → System → Security → Authentication to choose authentication protocol and method according to your needs.
DS-2TD2137-7P Thermal Network Camera User Manual Search Security Audit Logs You can search and analyze the device security log files to find illegal intrusion and troubleshoot security events. Steps NOTE: This function is supported only by certain camera models. 1. Go to Configuration → System → Maintenance → Security Audit Log. 2. Select log types, Start Time, and End Time. 3. Click Search. The log files that match the search conditions will be displayed on the Log List. 4.
DS-2TD2137-7P Thermal Network Camera User Manual 2. Check Enable SSH. 3. Click Save. Set HTTPS HTTPS is a network protocol that enables encrypted transmission and identity authentication, which improves remote access security. Steps 1. Go to Configuration → Network → Advanced Settings → HTTPS. 2. Check Enable. 3. Click Delete to recreate and install certificate.
DS-2TD2137-7P Thermal Network Camera User Manual 5. Import certificate to the device. • Select Signed certificate is available, and start the installation directly. Click Browse and Install to import the certificate to the device. • Select Create the certificate request first, and continue the installation. Click Browse and Install to import the certificate to the device. 6. Click Save.
DS-2TD2137-7P Thermal Network Camera User Manual 2. Click Add. Enter User Name, select Level, and enter Password. Assign remote permission to users based on needs. • Administrator: The administrator has the authority to all operations and can add users and operators and assign permissions. • User: Users can be assigned permission to view live video, set PTZ parameters, and change their own passwords, but no permission for other operations.
DS-2TD2137-7P Thermal Network Camera User Manual Chapter 13 Appendix Common Material Emissivity Reference Material Human Skin Printed Circuit Board Concrete Ceramic Rubber Paint Wood Pitch Brick Sand Soil Cloth Hard Paperboard White Paper Water Emissivity 0.98 0.91 0.95 0.92 0.95 0.93 0.85 0.96 0.95 0.90 0.92 0.98 0.90 0.90 0.96 Device Command Scan the following QR code to get device common serial port commands.