
Quick Start Guide
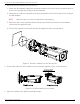

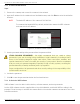
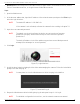
Table Of Contents
- Regulatory Information
- EU Conformity Statement
- Laws and Regulations
- Storage
- Transportation
- Installation
- Power Supply
- Battery
- System Security
- Maintenance
- Usage Environment
- Emergency
- 1. Appearance Description
- 2. Installation
- 3. Set the Network Camera over the LAN
- 4. Access via Web Browser
- 5. Appendix

DS-2TD2137-7P Thermal Network Bullet Camera Quick Start Guide
QSG DS-2TD2137-7P 041521NA 22
Steps
1.
Run the SADP software to search for online devices.
2.
Check the device status from the device list, and select the inactive device.
Figure 30, SADP Interface
The SADP software supports activating the camera in batch. See the SADP software user manual for details.
3.
Input the password in the password field, and confirm the password.
STRONG PASSWORD RECOMMENDED − We highly recommend that you create a strong
password of your own choosing (using a minimum of eight characters, including at least
three of the following categories: upper case letters, lower case letters, numbers, and
special characters) in order to increase the security of your product. We also recommend
that you reset your password regularly. Especially in high security systems, resetting the
password monthly or weekly can better protect your product.
Proper configuration of all passwords and other security settings is the responsibility of the
installer and/or end-user.
4.
Click OK to save the password.
You can check if the activation is completed on the pop-up window. If activation failed, make sure that
the password meets the requirement and try again.
3.3
Modify the IP Address
Purpose
To view and configure the camera via a LAN (Local Area Network), connect the network camera in the
same subnet as your PC. Then, install the SADP software or client software to search for and change the
network camera IP address. We will take modifying the IP address via SADP software as an example to
introduce IP address modification.