
Quick Start Guide
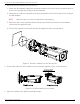

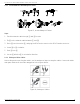
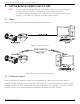
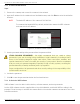
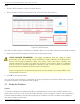
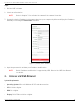
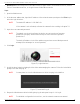
Table Of Contents
- Regulatory Information
- EU Conformity Statement
- Laws and Regulations
- Storage
- Transportation
- Installation
- Power Supply
- Battery
- System Security
- Maintenance
- Usage Environment
- Emergency
- 1. Appearance Description
- 2. Installation
- 3. Set the Network Camera over the LAN
- 4. Access via Web Browser
- 5. Appendix

DS-2TD2137-7P Thermal Network Bullet Camera Quick Start Guide
QSG DS-2TD2137-7P 041521NA 21
3.2.1 Activate via Web Browser
Steps
1.
Power on the camera, and connect the camera to the network.
2.
Input the IP address into the address bar of the Web browser, and click Enter to enter the activation
interface.
NOTE: The default IP address of the camera is 192.168.1.64.
For cameras that enable DHCP by default, activate the camera via SADP software
and search for the IP address.
Figure 29, Activation Interface (Web)
3.
Create a password and input the password into the password field.
STRONG PASSWORD RECOMMENDED − We highly recommend that you create a strong
password of your own choosing (using a minimum of eight characters, including at least
three of the following categories: upper case letters, lower case letters, numbers, and
special characters) in order to increase the security of your product. We also recommend
that you reset your password regularly. Especially in high security systems, resetting the
password monthly or weekly can better protect your product.
Proper configuration of all passwords and other security settings is the responsibility of the
installer and/or end-user.
4.
Confirm the password.
5.
Click OK to save the password and enter the live view interface.
3.2.2 Activate via SADP Software
SADP software is used to detect online devices, activate cameras, and reset passwords.
Get the SADP software from the supplied disk or the official Website, and install SADP according to the
prompts. Follow the steps to activate the camera. Refer to the network camera user manual for two other
activation methods.