
User Manual
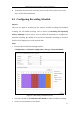


Table Of Contents
- Chapter 1 System Requirement
- Chapter 2 Network Connection
- Chapter 3 Access to the Network Camera
- Chapter 4 Live View
- Chapter 5 Network Camera Configuration
- 5.1 Configuring Local Parameters
- 5.2 Configuring Time Settings
- 5.3 Configuring Network Settings
- 5.3.1 Configuring TCP/IP Settings
- 5.3.2 Configuring Port Settings
- 5.3.3 Configuring PPPoE Settings
- 5.3.4 Configuring DDNS Settings
- 5.3.5 Configuring SNMP Settings
- 5.3.6 Configuring 802.1X Settings
- 5.3.7 Configuring QoS Settings
- 5.3.8 Configuring UPnP™ Settings
- 5.3.9 Email Sending Triggered by Alarm
- 5.3.10 Configuring NAT (Network Address Translation) Settings
- 5.3.11 Configuring FTP Settings
- 5.3.12 HTTPS Settings
- 5.4 Configuring Video and Audio Settings
- 5.5 Configuring Image Parameters
- 5.6 Configuring and Handling Alarm Events
- 5.7 Temperature Measurement
- 5.8 VCA Configuration
- Chapter 6 Storage Settings
- Chapter 7 Playback
- Chapter 8 Log Searching
- Chapter 9 Others
- Appendix

Thermometric Network Bullet Camera User Manual
92
● To initialize and use the SD card after insert it to the camera, please refer to the
steps of NAS disk initialization.
6.3 Configuring Recording Schedule
Purpose:
There are two kinds of recording for the cameras: manual recording and scheduled
recording. For the manual recording, refer to Section 4.3 Recording and Capturing
Pictures Manually. In this section, you can follow the instructions to configure the
scheduled recording. By default, the record files of scheduled recording are stored in
the SD card (if supported) or in the network disk.
Steps:
1. Enter the Record Schedule Settings interface:
Configuration > Advanced Configuration> Storage > Record Schedule
Figure 6-6 Recording Schedule Interface
2. Check the checkbox of Enable Record Schedule to enable scheduled recording.
3. Set the record parameters of the camera.