
User Manual
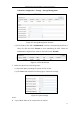
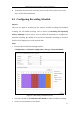


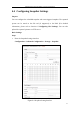


Table Of Contents
- Chapter 1 System Requirement
- Chapter 2 Network Connection
- Chapter 3 Access to the Network Camera
- Chapter 4 Live View
- Chapter 5 Network Camera Configuration
- 5.1 Configuring Local Parameters
- 5.2 Configuring Time Settings
- 5.3 Configuring Network Settings
- 5.3.1 Configuring TCP/IP Settings
- 5.3.2 Configuring Port Settings
- 5.3.3 Configuring PPPoE Settings
- 5.3.4 Configuring DDNS Settings
- 5.3.5 Configuring SNMP Settings
- 5.3.6 Configuring 802.1X Settings
- 5.3.7 Configuring QoS Settings
- 5.3.8 Configuring UPnP™ Settings
- 5.3.9 Email Sending Triggered by Alarm
- 5.3.10 Configuring NAT (Network Address Translation) Settings
- 5.3.11 Configuring FTP Settings
- 5.3.12 HTTPS Settings
- 5.4 Configuring Video and Audio Settings
- 5.5 Configuring Image Parameters
- 5.6 Configuring and Handling Alarm Events
- 5.7 Temperature Measurement
- 5.8 VCA Configuration
- Chapter 6 Storage Settings
- Chapter 7 Playback
- Chapter 8 Log Searching
- Chapter 9 Others
- Appendix

Thermometric Network Bullet Camera User Manual
91
Advanced Configuration > Storage > Storage Management
Figure 6-3 Storage Management Interface
(2) If the status of the disk is Uninitialized, check the corresponding checkbox to
select the disk and click Format to start initializing the disk. When the
initialization completed, the status of disk will become Normal.
Figure 6-4 View Disk Status
3. Define the quota for record and pictures.
(1) Input the quota percentage for picture and for record.
(2) Click Save and refresh the browser page to activate the settings.
Figure 6-5 Quota Settings
Notes:
● Up to 8 NAS disks can be connected to the camera.