
User Manual
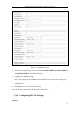


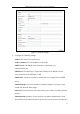
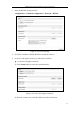

Table Of Contents
- Chapter 1 System Requirement
- Chapter 2 Network Connection
- Chapter 3 Access to the Network Camera
- Chapter 4 Live View
- Chapter 5 Network Camera Configuration
- 5.1 Configuring Local Parameters
- 5.2 Configuring Time Settings
- 5.3 Configuring Network Settings
- 5.3.1 Configuring TCP/IP Settings
- 5.3.2 Configuring Port Settings
- 5.3.3 Configuring PPPoE Settings
- 5.3.4 Configuring DDNS Settings
- 5.3.5 Configuring SNMP Settings
- 5.3.6 Configuring 802.1X Settings
- 5.3.7 Configuring QoS Settings
- 5.3.8 Configuring UPnP™ Settings
- 5.3.9 Email Sending Triggered by Alarm
- 5.3.10 Configuring NAT (Network Address Translation) Settings
- 5.3.11 Configuring FTP Settings
- 5.3.12 HTTPS Settings
- 5.4 Configuring Video and Audio Settings
- 5.5 Configuring Image Parameters
- 5.6 Configuring and Handling Alarm Events
- 5.7 Temperature Measurement
- 5.8 VCA Configuration
- Chapter 6 Storage Settings
- Chapter 7 Playback
- Chapter 8 Log Searching
- Chapter 9 Others
- Appendix

Thermometric Network Bullet Camera User Manual
46
name and password.
For your privacy and to better protect your system against security risks, we
strongly recommend the use of strong passwords for all functions and
network devices. The password should be something of your own choosing
(using a minimum of 8 characters, including upper case letters, lower case
letters, numbers and special characters) in order to increase the security of
your product.
Proper configuration of all passwords and other security settings is the
responsibility of the installer and/or end-user.
Choose Receiver: Select the receiver to which the email is sent. Up to 3 receivers
can be configured.
Receiver: The name of the user to be notified.
Receiver’s Address: The email address of user to be notified.
4. Click Save to save the settings.
5.3.10 Configuring NAT (Network Address Translation) Settings
Purpose:
NAT refers to the port mapping when UPnP™ is enabled.
Steps:
1. Enter the NAT settings interface.
Configuration >Advanced Configuration > Network > NAT
2. Choose the port mapping mode.
To port mapping with the default port numbers:
Choose Port Mapping Mode as Auto.
To port mapping with the customized port numbers:
Choose Port Mapping Mode as Manual.
And for manual port mapping, you can customize the value of the port number by
yourself.