
User Manual
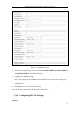


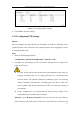

Table Of Contents
- Chapter 1 System Requirement
- Chapter 2 Network Connection
- Chapter 3 Access to the Network Camera
- Chapter 4 Live View
- Chapter 5 Network Camera Configuration
- 5.1 Configuring Local Parameters
- 5.2 Configuring Time Settings
- 5.3 Configuring Network Settings
- 5.3.1 Configuring TCP/IP Settings
- 5.3.2 Configuring Port Settings
- 5.3.3 Configuring PPPoE Settings
- 5.3.4 Configuring DDNS Settings
- 5.3.5 Configuring SNMP Settings
- 5.3.6 Configuring 802.1X Settings
- 5.3.7 Configuring QoS Settings
- 5.3.8 Configuring UPnP™ Settings
- 5.3.9 Email Sending Triggered by Alarm
- 5.3.10 Configuring NAT (Network Address Translation) Settings
- 5.3.11 Configuring FTP Settings
- 5.3.12 HTTPS Settings
- 5.4 Configuring Video and Audio Settings
- 5.5 Configuring Image Parameters
- 5.6 Configuring and Handling Alarm Events
- 5.7 Temperature Measurement
- 5.8 VCA Configuration
- Chapter 6 Storage Settings
- Chapter 7 Playback
- Chapter 8 Log Searching
- Chapter 9 Others
- Appendix

Thermometric Network Bullet Camera User Manual
42
The IEEE 802.1X standard is supported by the network cameras. When the feature is
enabled, the camera data is secured and user authentication is needed when
connecting the camera to the network protected by the IEEE 802.1X.
Before you start:
The authentication server must be configured. Please apply and register a user name
and password for 802.1X in the server.
For your privacy and to better protect your system against security risks, we
strongly recommend the use of strong passwords for all functions and network
devices. The password should be something of your own choosing (using a
minimum of 8 characters, including upper case letters, lower case letters,
numbers and special characters) in order to increase the security of your product.
Proper configuration of all passwords and other security settings is the
responsibility of the installer and/or end-user.
Steps:
1. Enter the 802.1X Settings interface:
Configuration > Advanced Configuration > Network > 802.1X
2. Check the Enable IEEE 802.1X checkbox to enable the feature.
3. Configure the 802.1X settings, including EAPOL version, user name and
password.
Note: The EAPOL version must be identical with that of the router or the switch.
4. Enter the user name and password to access the server.
Figure 5-15 802.1X Settings
5. Click Save to finish the settings.