
User Manual


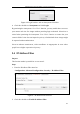


Table Of Contents
- Chapter 1 System Requirement
- Chapter 2 Network Connection
- Chapter 3 Access to the Network Camera
- Chapter 4 Live View
- Chapter 5 Network Camera Configuration
- 5.1 Configuring Local Parameters
- 5.2 Configuring Time Settings
- 5.3 Configuring Network Settings
- 5.3.1 Configuring TCP/IP Settings
- 5.3.2 Configuring Port Settings
- 5.3.3 Configuring PPPoE Settings
- 5.3.4 Configuring DDNS Settings
- 5.3.5 Configuring SNMP Settings
- 5.3.6 Configuring 802.1X Settings
- 5.3.7 Configuring QoS Settings
- 5.3.8 Configuring UPnP™ Settings
- 5.3.9 Email Sending Triggered by Alarm
- 5.3.10 Configuring NAT (Network Address Translation) Settings
- 5.3.11 Configuring FTP Settings
- 5.3.12 HTTPS Settings
- 5.4 Configuring Video and Audio Settings
- 5.5 Configuring Image Parameters
- 5.6 Configuring and Handling Alarm Events
- 5.7 Temperature Measurement
- 5.8 VCA Configuration
- Chapter 6 Storage Settings
- Chapter 7 Playback
- Chapter 8 Log Searching
- Chapter 9 Others
- Appendix

Thermometric Network Bullet Camera User Manual
110
Configuration > Basic Configuration> System > Maintenance
Or Configuration > Advanced Configuration> System > Maintenance
2. Click Restore or Default to restore the default settings.
Figure 9-13 Restore Default Settings
Note: After restoring to the default settings, the IP address is also restored to
the default IP address, please be careful for this action.
9.7.3 Exporting/Importing Configuration File
Purpose:
Configuration file is used for the batch configuration for cameras, which can simplify
the configuration steps when there are a lot of cameras needing configuring.
Steps:
1. Enter the Maintenance interface:
Configuration > Basic Configuration> System > Maintenance
or Configuration>Advanced Configuration> System > Maintenance
2. Click Export to export the current configuration file, and save it to the certain
place.
3. Click Browse to select the saved configuration file and then click Import to start
importing configuration file.
Note: You need to reboot the camera after importing configuration file.
4. Click Export and set the saving path to save the configuration file in local
storage.