
User Manual


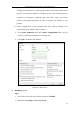
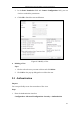

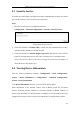
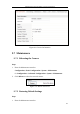

Table Of Contents
- Chapter 1 System Requirement
- Chapter 2 Network Connection
- Chapter 3 Access to the Network Camera
- Chapter 4 Live View
- Chapter 5 Network Camera Configuration
- 5.1 Configuring Local Parameters
- 5.2 Configuring Time Settings
- 5.3 Configuring Network Settings
- 5.3.1 Configuring TCP/IP Settings
- 5.3.2 Configuring Port Settings
- 5.3.3 Configuring PPPoE Settings
- 5.3.4 Configuring DDNS Settings
- 5.3.5 Configuring SNMP Settings
- 5.3.6 Configuring 802.1X Settings
- 5.3.7 Configuring QoS Settings
- 5.3.8 Configuring UPnP™ Settings
- 5.3.9 Email Sending Triggered by Alarm
- 5.3.10 Configuring NAT (Network Address Translation) Settings
- 5.3.11 Configuring FTP Settings
- 5.3.12 HTTPS Settings
- 5.4 Configuring Video and Audio Settings
- 5.5 Configuring Image Parameters
- 5.6 Configuring and Handling Alarm Events
- 5.7 Temperature Measurement
- 5.8 VCA Configuration
- Chapter 6 Storage Settings
- Chapter 7 Playback
- Chapter 8 Log Searching
- Chapter 9 Others
- Appendix

Thermometric Network Bullet Camera User Manual
106
Figure 9-6 Login Interface with an Anonymous Checkbox
4. Check the checkbox of Anonymous and click Login.
By permitting the Anonymous “Live View” function, you may enable others to access
your camera and view live images without providing login credentials. It therefore is
critical when permitting the Anonymous "Live View" function to ensure that your
camera's field of view does not impact the privacy of individuals whose images might
be captured without authorization.
Given its inherent intrusiveness, video surveillance is inappropriate in areas where
people have a higher expectation of privacy.
9.4 IP Address Filter
Purpose:
This function makes it possible for access control.
Steps:
1. Enter the IP Address Filter interface:
Configuration> Advanced Configuration> Security > IP Address Filter
Figure 9-7 IP Address Filter Interface
2. Check the checkbox of Enable IP Address Filter.