
User Manual
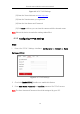
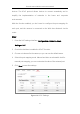
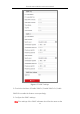
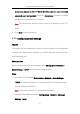
Table Of Contents
- Chapter 1 Overview
- Chapter 2 Network Connection
- Chapter 3 Access to the Network Camera
- Chapter 4 Live View
- Chapter 5 Network Camera Configuration
- Chapter 6 Network Settings
- Chapter 7 Video/Audio Settings
- Chapter 8 Image Settings
- Chapter 9 Event Settings
- Chapter 10 Storage Settings
- Chapter 11 Open Platform setting
- Chapter 12 Playback
- Chapter 13 Picture
- Appendix

Thermal Network Bullet Camera User Manual
61
devices. The UPnP protocol allows devices to connect seamlessly and to
simplify the implementation of networks in the home and corporate
environments.
With the function enabled, you don’t need to configure the port mapping for
each port, and the camera is connected to the Wide Area Network via the
router.
Steps:
1. Enter the NAT settings interface. Configuration > Network > Basic
Settings > NAT.
2. Check the checkbox to enable the UPnP™ function.
3. Choose a nickname for the camera, or you can use the default name.
4. Select the port mapping mode. Manual and Auto are selectable. And for
manual port mapping, you can customize the value of the external port.
5. Click Save to save the settings.
Figure 6-6 UPnP Settings