
User Manual
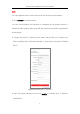
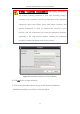
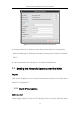
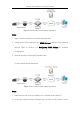
Table Of Contents
- Chapter 1 Overview
- Chapter 2 Network Connection
- Chapter 3 Access to the Network Camera
- Chapter 4 Live View
- Chapter 5 Network Camera Configuration
- Chapter 6 Network Settings
- Chapter 7 Video/Audio Settings
- Chapter 8 Image Settings
- Chapter 9 Event Settings
- Chapter 10 Storage Settings
- Chapter 11 Open Platform setting
- Chapter 12 Playback
- Chapter 13 Picture
- Appendix

Thermal Network Bullet Camera User Manual
9
Note:
You can enable the Hik-Connect service for the device during activation.
4. Click Activate to start activation.
You can check whether the activation is completed on the popup window. If
activation failed, please make sure that the password meets the requirement
and try again.
5. Change the device IP address to the same subnet with your computer by
either modifying the IP address manually or checking the checkbox of Enable
DHCP.
Figure 2-5 Modify the IP Address
6. Input the admin password and click Modify to activate your IP address
modification.