
User Manual


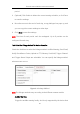
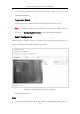
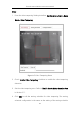
Table Of Contents
- Chapter 1 Overview
- Chapter 2 Network Connection
- Chapter 3 Access to the Network Camera
- Chapter 4 Live View
- Chapter 5 Network Camera Configuration
- Chapter 6 Network Settings
- Chapter 7 Video/Audio Settings
- Chapter 8 Image Settings
- Chapter 9 Event Settings
- Chapter 10 Storage Settings
- Chapter 11 Open Platform setting
- Chapter 12 Playback
- Chapter 13 Picture
- Appendix

Thermal Network Bullet Camera User Manual
104
areas are supported.
2. Select OFF for Switch Day and Night Settings.
3. Select the area by clicking the area No.
4. Slide the cursor to adjust the sensitivity and proportion of object on the
area for the selected area.
5. Set the arming schedule and linkage method as in the normal
configuration mode.
6. Click Save to save the settings.
Day/Night Auto-Switch
Steps:
1. Draw the detection area as in the normal configuration mode. Up to 8
areas are supported.
2. Select Auto-Switch for Switch Day and Night Settings.
3. Select the area by clicking the area No.
4. Slide the cursor to adjust the sensitivity and proportion of object on the
area for the selected area in the daytime.
5. Slide the cursor to adjust the sensitivity and proportion of object on the
area for the selected area at night.
6. Set the arming schedule and linkage method as in the normal
configuration mode.
7. Click Save to save the settings.
Day/Night Scheduled-Switch