
User Manual
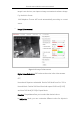
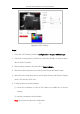
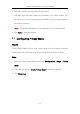
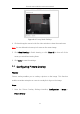
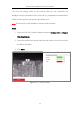
Table Of Contents
- Chapter 1 Overview
- Chapter 2 Network Connection
- Chapter 3 Access to the Network Camera
- Chapter 4 Live View
- Chapter 5 Network Camera Configuration
- Chapter 6 Network Settings
- Chapter 7 Video/Audio Settings
- Chapter 8 Image Settings
- Chapter 9 Event Settings
- Chapter 10 Storage Settings
- Chapter 11 Open Platform setting
- Chapter 12 Playback
- Chapter 13 Picture
- Appendix

Thermal Network Bullet Camera User Manual
91
Figure 8-3 OSD Settings
Steps:
1. Enter the OSD Settings interface: Configuration > Image > OSD Settings.
2. Check the corresponding checkbox to select the display of camera name,
date or week if required.
3. Edit the camera name in the text field of Camera Name.
4. Select from the drop-down list to set the time format and date format.
5. Select from the drop-down list to set the time format, date format, display
mode, OSD size and OSD color.
6. Configure the text overlay settings.
(1) Check the checkbox in front of the textbox to enable the on-screen
display.
(2) Input the characters in the textbox.
Note: Up to 8 text overlays are configurable.