
User Manual
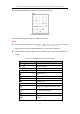
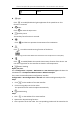
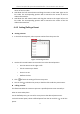
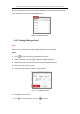


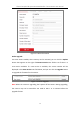
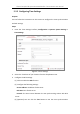
Table Of Contents
- Chapter 1 System Requirement
- Chapter 2 Network Connection
- Chapter 3 Access to the Network Camera
- Chapter 4 Live View
- Chapter 5 Network Camera Configuration
- Chapter 6 Network Settings
- Chapter 7 Video/Audio Settings
- Chapter 8 Image Settings
- Chapter 9 Event Settings
- Chapter 10 Storage Settings
- Chapter 11 Playback
- Chapter 12 Picture
- Appendix

Thermal & Optical Bi-spectrum Network Bullet / Turret Camera User Manual
22
center of the live video.
4. Hold down the left mouse button and drag the mouse to the lower right on the
live video. The corresponding position will be moved to the center of the live
video and zoomed in.
5. Hold down the left mouse button and drag the mouse to the upper left on the
live video. The corresponding position will be moved to the center of the live
video and zoomed out.
4.4.2 Setting/Calling a Preset
Setting a Preset:
1. In the PTZ control panel, select a preset number from the preset list.
Figure 4-4 Setting a Preset
2. Use the PTZ control buttons to move the lens to the desired position.
• Pan the camera to the right or left.
• Tilt the camera up or down.
• Zoom in or out.
• Refocus the lens.
3. Click to finish the setting of the current preset.
4. You can click to delete the preset, or double-click to edit the preset name.
Calling a Preset:
This feature enables the camera to point to a specified preset scene manually or
when an event takes place.
For the defined preset, you can call it at any time to the desired preset scene.
In the PTZ control panel, select a defined preset from the list and click to call the
preset.