
User Manual
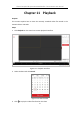
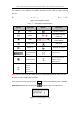


Table Of Contents
- Chapter 1 System Requirement
- Chapter 2 Network Connection
- Chapter 3 Access to the Network Camera
- Chapter 4 Live View
- Chapter 5 Network Camera Configuration
- Chapter 6 Network Settings
- Chapter 7 Video/Audio Settings
- Chapter 8 Image Settings
- Chapter 9 Event Settings
- Chapter 10 Storage Settings
- Chapter 11 Playback
- Chapter 12 Picture
- Appendix

Thermal & Optical Bi-spectrum Network Bullet / Turret Camera User Manual
130
users.
(2) If you use the memory card (with a lock) on a different camera, you can go to
HDD Management interface to unlock the memory card manually. Select the
memory card, and click the Unlock button shown next to the Format button.
Then input the correct password to unlock it.
Notes:
• The memory card can only be read and written in when it is unlocked.
• If the camera, which adds a lock to a memory card, is restored to the
factory settings, you can go to the HDD Management interface to unlock
the memory card.
Remove the Lock
(1) Select the Lock Switch as OFF.
(2) Input the correct password in Password Settings text field.
(3) Click Save to save the settings.
4. Set the Arming Schedule and Linkage Method, if you want to receive a
notification when the health status of the memory card is anything other than
good. Refer to Task 2: Set the Arming Schedule for Motion Detection and Task 3:
Set the Linkage Method for Motion Detection in Section 9.1.1.
5. Click Save to save the settings.
10.5 Configuring Lite Storage
Purpose:
When there is no moving object in the monitoring scenario, the frame rate and
bitrate of the video stream can be reduced to lengthen the storage time of the
memory card.
Notes:
Lite storage function varies according to different camera models.
The video files recorded in lite storage mode will be played back in full frame