
User Manual
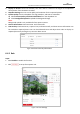


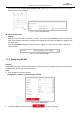
Table Of Contents
- About This Document
- Chapter 1 Activating and Accessing to the Camera
- Chapter 2 Setting Local Parameters and Network
- Chapter 3 Live View
- Chapter 4 PTZ Control
- 4.1 Operating PTZ Control
- 4.2 PTZ Configuration
- 4.2.1 Configuring Basic PTZ Parameters
- 4.2.2 Configuring PTZ Limits
- 4.2.3 Configuring Initial Position
- 4.2.4 Configuring Park Action
- 4.2.5 Configuring Privacy Mask for PTZ Camera Channel
- 4.2.6 Configuring Scheduled Tasks
- 4.2.7 Clearing PTZ Configurations
- 4.2.8 Configuring PTZ Control Priority
- 4.2.9 Configuring Panorama Tracking
- 4.2.10 Rapid Focus
- Chapter 5 Storage and Playback
- Chapter 6 Events Settings
- Chapter 7 System Settings
- Appendix
- Appendix 1 SADP Software Introduction
- Appendix 2 Statics, Interference Lightning and Surge Protection
- Appendix 3 Waterproof
- Appendix 4 Bubble Maintenance
- Appendix 5 RS-485 Bus Connection
- Appendix 6 24VAC Wire Gauge & Transmission Distance
- Appendix 7 12VDC Wire Gauge & Transmission Distance
- Appendix 8 Table of Wire Gauge Standards
- Appendix 9 Alarm In/Out Connections
- Appendix 10 Camera Function Description

User Manual of PanoVu Series Network Camera
99
1. Check Enable Data Uploading checkbox, and the data of people density detection will be uploaded
to surveillance center.
2. Check Enable Picture Uploading checkbox, the alarm will be uploaded to surveillance center with
pictures.
3. Set Uploading Mode. Scheduled Uploading and Instant Uploading are selectable.
Scheduled Uploading: The detection data and pictures can be uploaded to surveillance center
at certain time interval.
Check Scheduled Uploading checkbox to enable the function, and select a Statistics Cycle from
the dropdown list.
Instant Uploading: Once the level of people density changes, the detection data and pictures
will be uploaded to surveillance center immediately.
Check Instant Uploading checkbox to enable the function.
4. Configure HTTP Data Transmission. Input IP address, URL and Port, then click Test to test if it
succeeds.
5. Click Save to save the settings.
6.5.3 Advanced Configuration
Configure the overlay information displayed on live image.
Figure 6-36 Advanced Configuration
Steps:
1. Check Display Rule Info. on Stream to enable this function.
2. Choose Flow Overlay from the dropdown list, None, Level, Number of People, and Number of
People/Level are selectable.
3. Edit Region Name for every detection area you set before.
4. Click Save to save the settings.