
User Manual
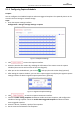
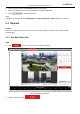
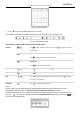


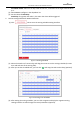
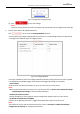
Table Of Contents
- About This Document
- Chapter 1 Activating and Accessing to the Camera
- Chapter 2 Setting Local Parameters and Network
- Chapter 3 Live View
- Chapter 4 PTZ Control
- 4.1 Operating PTZ Control
- 4.2 PTZ Configuration
- 4.2.1 Configuring Basic PTZ Parameters
- 4.2.2 Configuring PTZ Limits
- 4.2.3 Configuring Initial Position
- 4.2.4 Configuring Park Action
- 4.2.5 Configuring Privacy Mask
- 4.2.6 Configuring Scheduled Tasks
- 4.2.7 Clearing PTZ Configurations
- 4.2.8 Configuring PTZ Control Priority
- 4.2.9 Configuring Panorama Tracking
- 4.2.10 Rapid Focus
- Chapter 5 Storage and Playback
- Chapter 6 Events Settings
- Chapter 7 System Settings
- Appendix
- Appendix 1 SADP Software Introduction
- Appendix 2 Statics, Interference Lightning and Surge Protection
- Appendix 3 Waterproof
- Appendix 4 Bubble Maintenance
- Appendix 5 RS-485 Bus Connection
- Appendix 6 24VAC Wire Gauge & Transmission Distance
- Appendix 7 12VDC Wire Gauge & Transmission Distance
- Appendix 8 Table of Wire Gauge Standards
- Appendix 9 Alarm In/Out Connections
- Appendix 10 Camera Function Description

User Manual of PanoVu Series Network Camera
65
10. Click to save the settings.
5.1.5 Cloud Storage
Purpose:
The captured pictures can be saved on an NVR which works in the Cloud Storage mode.
Note:
Cloud storage function varies according to different camera models.
Before you start:
Make sure the NVR has been switched into the Cloud Storage working mode, refer to the User Manual
of NVR for details.
Steps:
1. Check the checkbox of Enable Cloud Storage.
2. Input the IP address and port of the storage server.
3. Input the user name, password and confirm password for the authentication of the storage server.
4. Input picture storage pool ID on the server.
5. (Optional) You can click Test to test the cloud storage settings.
6. Click Save to save the settings.
Note:
The storage server port ranges from 2000 to 65535 and the picture storage pool ID ranges from 1 to
255.
5.2 Picture
Purpose:
This section explains how to view the captured picture files stored in the network disks and download
the captured pictures.
Steps:
1. Click on the menu bar to enter picture interface.
Figure 5-10 Picture Interface
2. Select the search conditions, including the picture type, start time, and end time, then click Search.
The results will be listed on the picture list area.