
User Manual
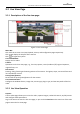
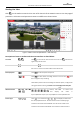
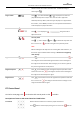
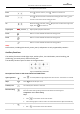

Table Of Contents
- About This Document
- Chapter 1 Activating and Accessing to the Camera
- Chapter 2 Setting Local Parameters and Network
- Chapter 3 Live View
- Chapter 4 PTZ Control
- 4.1 Operating PTZ Control
- 4.2 PTZ Configuration
- 4.2.1 Configuring Basic PTZ Parameters
- 4.2.2 Configuring PTZ Limits
- 4.2.3 Configuring Initial Position
- 4.2.4 Configuring Park Action
- 4.2.5 Configuring Privacy Mask
- 4.2.6 Configuring Scheduled Tasks
- 4.2.7 Clearing PTZ Configurations
- 4.2.8 Configuring PTZ Control Priority
- 4.2.9 Configuring Panorama Tracking
- 4.2.10 Rapid Focus
- Chapter 5 Storage and Playback
- Chapter 6 Events Settings
- Chapter 7 System Settings
- Appendix
- Appendix 1 SADP Software Introduction
- Appendix 2 Statics, Interference Lightning and Surge Protection
- Appendix 3 Waterproof
- Appendix 4 Bubble Maintenance
- Appendix 5 RS-485 Bus Connection
- Appendix 6 24VAC Wire Gauge & Transmission Distance
- Appendix 7 12VDC Wire Gauge & Transmission Distance
- Appendix 8 Table of Wire Gauge Standards
- Appendix 9 Alarm In/Out Connections
- Appendix 10 Camera Function Description

User Manual of PanoVu Series Network Camera
31
3.3 Configuring Image Settings
3.3.1 Configuring Display Settings
Purpose:
You can set the image quality of the camera, including brightness, contrast, saturation, sharpness, etc.
Notes:
The parameters in Display Settings interface vary depending on different camera models.
You can double click the live view to enter full screen mode and double click it again to exit.
Steps:
1. Enter the Display Settings interface:
Configuration > Image> Display Settings
2. Select channel No. of the camera.
3. You can select the Mounting Scenario from the dropdown list with different predefined image
parameters.
4. Set the image parameters of the camera.
2. Operate the 3D positioning function:
Left click a position of the live video. The corresponding position will be moved to the
center of the live video.
Hold down the left mouse button and drag the mouse to the lower right on the live
video. The corresponding position will be moved to the center of the live video and
zoomed in.
Hold down the left mouse button and drag the mouse to the upper left on the live
video. The corresponding position will be moved to the center of the live video and
zoomed out.
Note:
When you perform 3D positioning on Camera 2 or Camera 3, the Camera 1 will move
to the corresponding position.
Lens Initialization
Click and the lens operates the movements for initialization.
Face Capture
Steps:
1. Click to start manual face capture.
2. Frame the target face in PTZ camera channel by left-click and drag to draw a frame.
3. Click the icon again to stop manual face capture.
Note:
To use manual face capture, you should configure Face Capture function first. Go to
Configuration > Face Capture. The function is only available for certain camera models.