
User Manual
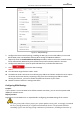
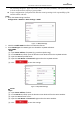
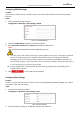

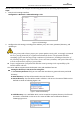
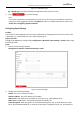
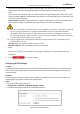
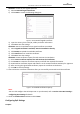
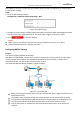
Table Of Contents
- About This Document
- Chapter 1 Activating and Accessing to the Camera
- Chapter 2 Setting Local Parameters and Network
- Chapter 3 Live View
- Chapter 4 PTZ Control
- 4.1 Operating PTZ Control
- 4.2 PTZ Configuration
- 4.2.1 Configuring Basic PTZ Parameters
- 4.2.2 Configuring PTZ Limits
- 4.2.3 Configuring Initial Position
- 4.2.4 Configuring Park Action
- 4.2.5 Configuring Privacy Mask
- 4.2.6 Configuring Scheduled Tasks
- 4.2.7 Clearing PTZ Configurations
- 4.2.8 Configuring PTZ Control Priority
- 4.2.9 Configuring Panorama Tracking
- 4.2.10 Rapid Focus
- Chapter 5 Storage and Playback
- Chapter 6 Events Settings
- Chapter 7 System Settings
- Appendix
- Appendix 1 SADP Software Introduction
- Appendix 2 Statics, Interference Lightning and Surge Protection
- Appendix 3 Waterproof
- Appendix 4 Bubble Maintenance
- Appendix 5 RS-485 Bus Connection
- Appendix 6 24VAC Wire Gauge & Transmission Distance
- Appendix 7 12VDC Wire Gauge & Transmission Distance
- Appendix 8 Table of Wire Gauge Standards
- Appendix 9 Alarm In/Out Connections
- Appendix 10 Camera Function Description

User Manual of PanoVu Series Network Camera
21
should be set as 465 for this encryption method. When you select SSL or TLS and enable STARTTLS,
emails will be sent after encrypted by STARTTLS, and the SMTP port should be set as 25.
Note:
If you want to use STARTTLS, make sure that the protocol is supported by your e-mail server. If you
check the Enable STARTTLS checkbox when the protocol is not supported by your e-mail sever, your
e-mail will not be encrypted.
Authentication (optional): If your email server requires authentication, check this checkbox to use
authentication to log in to this server and input the login user name and password.
For your privacy and to better protect your system against security risks, we strongly recommend
the use of strong passwords for all functions and network devices. The password should be
something of your own choosing (Using a minimum of 8 characters, including at least three of
the following categories: upper case letters, lower case letters, numbers, and special characters.)
in order to increase the security of your product.
Proper configuration of all passwords and other security settings is the responsibility of the
installer and/or end-user.
Receiver: Input the receiver to which the email is sent.
Receiver’s Address: The email address of user to be notified.
Note:
You can click to check whether the setting is invalid after the required parameters are
configured.
3. Click to save the settings.
Configuring HTTPS Settings
Purpose:
HTTPS provides authentication of the web site and associated web server that one is communicating
with, which protects against Man-in-the-middle attacks. Perform the following steps to set the port
number of https.
Example:
If you set the port number as 443 and the IP address is 192.168.1.64, you may access the device by
inputting https://192.168.1.64:443 via the web browser.
Steps:
1. Enter the HTTPS settings interface.
Configuration > Network > Advanced Settings > HTTPS
2. Create the self-signed certificate or authorized certificate.
Figure 2-13 Create Certificate