
User Manual
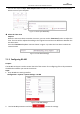

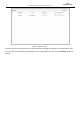
Table Of Contents
- About This Document
- Chapter 1 Activating and Accessing to the Camera
- Chapter 2 Setting Local Parameters and Network
- Chapter 3 Live View
- Chapter 4 PTZ Control
- 4.1 Operating PTZ Control
- 4.2 PTZ Configuration
- 4.2.1 Configuring Basic PTZ Parameters
- 4.2.2 Configuring PTZ Limits
- 4.2.3 Configuring Initial Position
- 4.2.4 Configuring Park Action
- 4.2.5 Configuring Privacy Mask
- 4.2.6 Configuring Scheduled Tasks
- 4.2.7 Clearing PTZ Configurations
- 4.2.8 Configuring PTZ Control Priority
- 4.2.9 Configuring Panorama Tracking
- 4.2.10 Rapid Focus
- Chapter 5 Storage and Playback
- Chapter 6 Events Settings
- Chapter 7 System Settings
- Appendix
- Appendix 1 SADP Software Introduction
- Appendix 2 Statics, Interference Lightning and Surge Protection
- Appendix 3 Waterproof
- Appendix 4 Bubble Maintenance
- Appendix 5 RS-485 Bus Connection
- Appendix 6 24VAC Wire Gauge & Transmission Distance
- Appendix 7 12VDC Wire Gauge & Transmission Distance
- Appendix 8 Table of Wire Gauge Standards
- Appendix 9 Alarm In/Out Connections
- Appendix 10 Camera Function Description

User Manual of PanoVu Series Network Camera
95
Note:
The Baud rate, PTZ Protocol and PTZ Address parameters of the camera should be exactly the same
as those of the control device.
7.1.4 Configuring DST (Daylight Saving Time)
Purpose:
If there is the habit of adjusting clocks forward in your country in certain time period of a year, you can
turn this function on. The time will be adjusted automatically when the Daylight Saving Time (DST)
comes.
Steps:
1. Enter the DST settings interface:
Configuration > System > System Settings > DST
2. Check to enable the DST function.
3. Set the date of the DST period.
4. Click to save the settings.
Figure 7-7 DST Settings
7.1.5 VCA Resource
VCA resource offers users options to enable certain VCA function and disable others when several VCA
functions are available. It helps allocate more resources to the wanted functions.
Steps:
1. Enter the VCA Resource interface: Configuration > System settings > VCA Resource
2. Select the desired VCA option.
3. Save the settings. A reboot is needed for the settings to take effect.
Note:
The function may not be supported by some camera models.
7.1.6 About
Click View License, you can check Open Source Software Licenses.