
Operation Manual


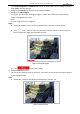

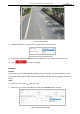
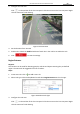


Table Of Contents
- About This Document
- Chapter 1 Activating and Accessing to the Camera
- Chapter 2 Setting Local Parameters and Network
- Chapter 3 Live View
- Chapter 4 PTZ Control
- 4.1 Operating PTZ Control
- 4.2 PTZ Configuration
- 4.2.1 Configuring Basic PTZ Parameters
- 4.2.2 Configuring PTZ Limits
- 4.2.3 Configuring Initial Position
- 4.2.4 Configuring Park Action
- 4.2.5 Configuring Privacy Mask
- 4.2.6 Configuring Scheduled Tasks
- 4.2.7 Clearing PTZ Configurations
- 4.2.8 Configuring PTZ Control Priority
- 4.2.9 Configuring Panorama Tracking
- 4.2.10 Configuring Eagle Vision Focus
- Chapter 5 Storage and Playback
- Chapter 6 Alarm and Events
- 6.1 Basic Event Configuration
- 6.2 Smart Event Configuration
- 6.3 VCA Configuration
- Chapter 7 Maintenance
- Appendix
- Appendix 1 SADP Software Introduction
- Appendix 2 Statics, Interference Lightning and Surge Protection
- Appendix 3 Waterproof
- Appendix 4 Bubble Maintenance
- Appendix 5 RS-485 Bus Connection
- Appendix 6 24VAC Wire Gauge & Transmission Distance
- Appendix 7 12VDC Wire Gauge & Transmission Distance
- Appendix 8 Table of Wire Gauge Standards
- Appendix 9 Alarm In/Out Connections
- Appendix 10 Camera Function Description

User Manual of PanoVu Series Network Camera
85
16. Click to save the settings.
Note:
You can select to copy the settings to whole week or are specific days of the week. At most 8
segments can be configured.
Alarm Linkage
Steps:
1. Enter the Alarm Linkage settings interface:
Configuration > VCA > Scene Configuration > Scene > Alarm Linkage
Figure 6-26 Alarm Linkage Interface
2. Select a rule from the rule list.
3. Check the checkbox of corresponding linkage actions to enable it.
4. Click to save the settings.
6.3.6 Scene Auto-switch
Purpose:
You can set the sequence for the scene when doing patrol tracking (at least one scene is required
to enable scene auto-switch).
Steps:
1. Enter the Scene Auto-switch interface:
Configuration > VCA > Scene Auto-switch.
Figure 6-27 Scene Auto-switch Interface