
Operation Manual

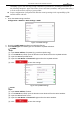


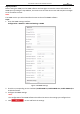

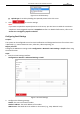


Table Of Contents
- About This Document
- Chapter 1 Activating and Accessing to the Camera
- Chapter 2 Setting Local Parameters and Network
- Chapter 3 Live View
- Chapter 4 PTZ Control
- 4.1 Operating PTZ Control
- 4.2 PTZ Configuration
- 4.2.1 Configuring Basic PTZ Parameters
- 4.2.2 Configuring PTZ Limits
- 4.2.3 Configuring Initial Position
- 4.2.4 Configuring Park Action
- 4.2.5 Configuring Privacy Mask
- 4.2.6 Configuring Scheduled Tasks
- 4.2.7 Clearing PTZ Configurations
- 4.2.8 Configuring PTZ Control Priority
- 4.2.9 Configuring Panorama Tracking
- 4.2.10 Configuring Eagle Vision Focus
- Chapter 5 Storage and Playback
- Chapter 6 Alarm and Events
- 6.1 Basic Event Configuration
- 6.2 Smart Event Configuration
- 6.3 VCA Configuration
- Chapter 7 Maintenance
- Appendix
- Appendix 1 SADP Software Introduction
- Appendix 2 Statics, Interference Lightning and Surge Protection
- Appendix 3 Waterproof
- Appendix 4 Bubble Maintenance
- Appendix 5 RS-485 Bus Connection
- Appendix 6 24VAC Wire Gauge & Transmission Distance
- Appendix 7 12VDC Wire Gauge & Transmission Distance
- Appendix 8 Table of Wire Gauge Standards
- Appendix 9 Alarm In/Out Connections
- Appendix 10 Camera Function Description

User Manual of PanoVu Series Network Camera
17
2. Set the HTTP port, RTSP port, HTTPS port and port of the camera.
HTTP Port: The default port number is 80.
RTSP Port: The default port number is 554.
HTTPS Port: The default port number is 443.
Server Port: The default port number is 8000.
3. Click to save the settings.
Configuring NAT (Network Address Translation) Settings
Purpose:
Universal Plug and Play (UPnP™) is a networking architecture that provides compatibility among
networking equipment, software and other hardware devices. The UPnP protocol allows devices to
connect seamlessly and to simplify the implementation of networks in the house and corporate
environments.
With the function enabled, you don’t need to configure the port mapping for each port, and the
camera is connected to the Wide Area Network via the router.
Steps:
1. Enter the NAT settings interface by
Configuration > Network > Basic Settings > NAT
2. Check the checkbox to enable the UPnP™ function.
3. Set the port mapping mode:
To port mapping with the default port numbers:
Choose
To port mapping with the customized port numbers:
Choose
And you can customize the value of the port No. by yourself.
Figure 2-7 Configure the Port No.
4. Click to save the settings.
2.2.2 Advanced Settings
Configuring SNMP Settings
Purpose:
You can use SNMP to get camera status and parameters related information.