
Operation Manual

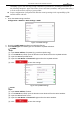


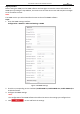

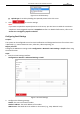


Table Of Contents
- About This Document
- Chapter 1 Activating and Accessing to the Camera
- Chapter 2 Setting Local Parameters and Network
- Chapter 3 Live View
- Chapter 4 PTZ Control
- 4.1 Operating PTZ Control
- 4.2 PTZ Configuration
- 4.2.1 Configuring Basic PTZ Parameters
- 4.2.2 Configuring PTZ Limits
- 4.2.3 Configuring Initial Position
- 4.2.4 Configuring Park Action
- 4.2.5 Configuring Privacy Mask
- 4.2.6 Configuring Scheduled Tasks
- 4.2.7 Clearing PTZ Configurations
- 4.2.8 Configuring PTZ Control Priority
- 4.2.9 Configuring Panorama Tracking
- 4.2.10 Configuring Eagle Vision Focus
- Chapter 5 Storage and Playback
- Chapter 6 Alarm and Events
- 6.1 Basic Event Configuration
- 6.2 Smart Event Configuration
- 6.3 VCA Configuration
- Chapter 7 Maintenance
- Appendix
- Appendix 1 SADP Software Introduction
- Appendix 2 Statics, Interference Lightning and Surge Protection
- Appendix 3 Waterproof
- Appendix 4 Bubble Maintenance
- Appendix 5 RS-485 Bus Connection
- Appendix 6 24VAC Wire Gauge & Transmission Distance
- Appendix 7 12VDC Wire Gauge & Transmission Distance
- Appendix 8 Table of Wire Gauge Standards
- Appendix 9 Alarm In/Out Connections
- Appendix 10 Camera Function Description

User Manual of PanoVu Series Network Camera
15
something of your own choosing (Using a minimum of 8 characters, including at least three of
the following categories: upper case letters, lower case letters, numbers, and special characters.)
in order to increase the security of your product.
Proper configuration of all passwords and other security settings is the responsibility of the
installer and/or end-user.
Steps:
1. Enter the DDNS settings interface:
Configuration > Network > Basic Settings > DDNS
Figure 2-3 DDNS Settings
2. Check the Enable DDNS checkbox to enable this feature.
3. Select DDNS Type. Two DDNS types are selectable: DynDNS and NO-IP.
DynDNS:
Steps:
(1) Input Server Address of DynDNS (e.g. members.dyndns.org).
(2) In the Domain text field, input the domain name obtained from the DynDNS website.
(3) Input the Port of DynDNS server.
(4) Input the User Name and Password registered on the DynDNS website.
(5) Click to save the settings.
Figure 2-4 DynDNS Settings
NO-IP:
Steps:
(1) Input Server Address of NO-IP.
(2) In the Domain text field, input the domain name obtained from the NO-IP website.
(3) Input the Port of NO-IP server.
(4) Input the User Name and Password registered on the NO-IP website.
(5) Click to save the settings.