
User Manual
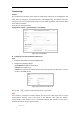
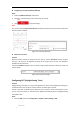
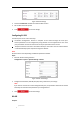

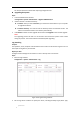

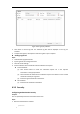
Table Of Contents
- Chapter 1 Overview
- Chapter 2 Network Connection
- Chapter 3 Accessing to the Network Speed Dome
- Chapter 4 Basic Operations
- Chapter 5 System Configuration
- 5.1 Storage Settings
- 5.2 Basic Event Configuration
- 5.3 Smart Event Configuration
- 5.4 PTZ Configuration
- 5.4.1 Configuring Basic PTZ Parameters
- 5.4.2 Configuring PTZ Limits
- 5.4.3 Configuring Initial Position
- 5.4.4 Configuring Park Actions
- 5.4.5 Configuring Privacy Mask
- 5.4.6 Configuring Scheduled Tasks
- 5.4.7 Clearing PTZ Configurations
- 5.4.8 Configuring Smart Tracking
- 5.4.9 Prioritize PTZ
- 5.4.10 Position Settings
- 5.4.11 Rapid Focus
- 5.5 Face Capture Configuration
- Chapter 6 Camera Configuration
- Appendix

© Hikvision
Configuring Time Synchronization Manually
Steps:
1. Check the Manual Time Sync radio button.
2. Click to set the system time from the pop-up calendar.
3. Click to save the settings.
Note:
You can also check the Sync with local time checkbox to synchronize the time of the camera with
the time of your computer.
Figure 6-47 Time Sync Manually
Select the Time Zone
Purpose:
When the camera is taken to another time zone, you can use the Time Zone function to adjust
the time. The time will be adjusted according to the original time and the time difference
between the two time zones.
From the Time Zone dropdown menu as shown in Figure 6-48, select the Time Zone in which the
camera locates.
Figure 6-48 Time Zone Settings
Configuring DST (Daylight Saving Time)
Purpose:
Daylight Saving Time (DST) is a way of making better use of the natural daylight by setting your
clock forward one hour during the summer months, and back again in the fall.
If there is the habit of adjusting clocks forward in your country in certain time period of a year,
you can turn this function on. The time will be adjusted automatically when the Daylight Saving
Time (DST) comes.
Steps:
1. Enter the DST interface by Configuration > System > System Settings > DST