
Quick Start Guide
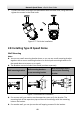
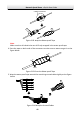
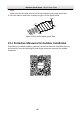

Table Of Contents
- 1 Overview
- 1.1 Speed Dome Overview
- 1.1.1 Overview of Type I Speed Dome
- 1.1.2 Overview of Type II Speed Dome
- 1.1.3 Overview of Type III Speed Dome
- 1.1.4 Overview of Type IV Speed Dome
- 1.1.5 Overview of Type V Speed Dome
- 1.1.6 Overview of Type VI Speed Dome
- 1.1.7 Overview of Type VII Speed Dome
- 1.1.8 Overview of Type VIII Speed Dome
- 1.1.9 Overview of Type IX Speed Dome
- 1.2 Cable Interfaces
- 1.3 Alarm Output
- 1.1 Speed Dome Overview
- 2 Installation
- 2.1 Installing Type I Speed Dome
- 2.2 Installing Type II Speed Dome
- 2.3 Installing Type III Speed Dome
- 2.4 Installing Type IV Speed Dome
- 2.5 Installing Type V Speed Dome
- 2.6 Installing Type VI and VII Speed Dome
- 2.7 Installing Type VIII Speed Dome
- 2.8 Installing Type IX Speed Dome
- 2.9 Installation of Network Cable Waterproof Jacket
- 2.10 Installation of Water-proof Tape
- 2.11 Protective Measures for Outdoor Installation
- 3 Activate and Access Network Camera

Network Speed Dome·Quick Start Guide
45
Cable Connector
Figure 2-82 Wrap the Water-proof Tape
Note:
Make sure that all naked wires are all firmly wrapped in the water-proof tape.
4. Press the tape on both ends of the connector to make sure no water can get in as the
figure below.
Press
Press
Press
Press
Figure 2-83 Press the Water-proof Tape
5. Wrap the water-proof tape around the remaining unused cables tightly as the figure
below.
Figure 2-84 Wrap the Unused Cables