
Quick Start Guide
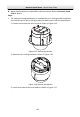
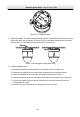

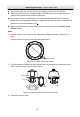
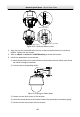
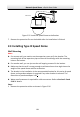
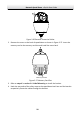
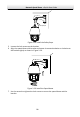
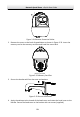
Table Of Contents
- 1 Overview
- 1.1 Speed Dome Overview
- 1.1.1 Overview of Type I Speed Dome
- 1.1.2 Overview of Type II Speed Dome
- 1.1.3 Overview of Type III Speed Dome
- 1.1.4 Overview of Type IV Speed Dome
- 1.1.5 Overview of Type V Speed Dome
- 1.1.6 Overview of Type VI Speed Dome
- 1.1.7 Overview of Type VII Speed Dome
- 1.1.8 Overview of Type VIII Speed Dome
- 1.1.9 Overview of Type IX Speed Dome
- 1.2 Cable Interfaces
- 1.3 Alarm Output
- 1.1 Speed Dome Overview
- 2 Installation
- 2.1 Installing Type I Speed Dome
- 2.2 Installing Type II Speed Dome
- 2.3 Installing Type III Speed Dome
- 2.4 Installing Type IV Speed Dome
- 2.5 Installing Type V Speed Dome
- 2.6 Installing Type VI and VII Speed Dome
- 2.7 Installing Type VIII Speed Dome
- 2.8 Installing Type IX Speed Dome
- 2.9 Installation of Network Cable Waterproof Jacket
- 2.10 Installation of Water-proof Tape
- 2.11 Protective Measures for Outdoor Installation
- 3 Activate and Access Network Camera

Network Speed Dome·Quick Start Guide
15
Figure 2-17 Install the bolts
2. Route the cables. The cables of speed dome can be routed either from the top or the
side of the back box, as shown in Figure 2-18. For the cables routed from the top of
the back box, it is required to drill a cable hole in the ceiling.
Figure 2-18 Cabling for Ceiling Mounting
3. Install the speed dome.
1). Rotate the bubble counterclockwise to separate it from the back box.
2). Remove the protective lens cover, foam, and sticker from the dome drive.
3). Attach the bubble to the back box, and rotate clockwise to secure it.
4). Use the mounting base as a template to mark four screw holes onto the ceiling.
5). If you route cables from the top of the back box, mark the cable hole on the
ceiling and drill a hole.
6). Secure the mounting base to the ceiling with the set screws.