
User Manual
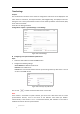
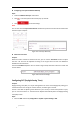
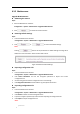
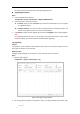
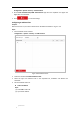
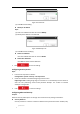
Table Of Contents
- Chapter 1 Overview
- Chapter 2 Network Connection
- Chapter 3 Accessing to the Network Speed Dome
- Chapter 4 Basic Operations
- Chapter 5 System Configuration
- 5.1 Storage Settings
- 5.2 Basic Event Configuration
- 5.3 Smart Event Configuration
- 5.4 PTZ Configuration
- 5.4.1 Configuring Basic PTZ Parameters
- 5.4.2 Configuring PTZ Limits
- 5.4.3 Configuring Initial Position
- 5.4.4 Configuring Park Actions
- 5.4.5 Configuring Privacy Mask
- 5.4.6 Configuring Scheduled Tasks
- 5.4.7 Clearing PTZ Configurations
- 5.4.8 Configuring Smart Tracking
- 5.4.9 Prioritize PTZ
- 5.4.10 Position Settings
- 5.4.11 Rapid Focus
- 5.5 Face Capture Configuration
- Chapter 6 Camera Configuration
- Appendix

© Hikvision
Time Settings
Purpose:
You can follow the instructions in this section to configure the time which can be displayed on the
video. There are Time Zone, Time Synchronization, and Daylight Saving Time (DST) functions for
setting the time. Time Synchronization consists of auto mode by Network Time Protocol (NTP)
server and manual mode.
Enter the Time Settings interface:
Configuration > System > System Settings > Time Settings
Figure 6-45 Time Settings
Configuring Time Synchronization by NTP Server
Steps:
1. Check the radio button to enable the NTP function.
2. Configure the following settings:
Server Address: IP address of NTP server.
NTP Port: Port of NTP server.
Interval: The time interval between the two synchronizing actions by NTP server. It can be
set from 1 to 10080 minutes.
Figure 6-46 Time Sync by NTP Server
You can click to make sure that the NTP server is connected.
Note:
If the camera is connected to a public network, you should use a NTP server that has a time
synchronization function, such as the server at the National Time Center (IP Address:
210.72.145.44). If the camera is set in a customized network, NTP software can be used to
establish a NTP server for time synchronization.