
Quick Start Guide
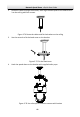
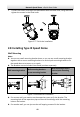
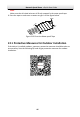
Table Of Contents
- 1 Overview
- 1.1 Speed Dome Overview
- 1.1.1 Overview of Type I Speed Dome
- 1.1.2 Overview of Type II Speed Dome
- 1.1.3 Overview of Type III Speed Dome
- 1.1.4 Overview of Type IV Speed Dome
- 1.1.5 Overview of Type V Speed Dome
- 1.1.6 Overview of Type VI Speed Dome
- 1.1.7 Overview of Type VII Speed Dome
- 1.1.8 Overview of Type VIII Speed Dome
- 1.1.9 Overview of Type IX Speed Dome
- 1.2 Cable Interfaces
- 1.3 Alarm Output
- 1.1 Speed Dome Overview
- 2 Installation
- 2.1 Installing Type I Speed Dome
- 2.2 Installing Type II Speed Dome
- 2.3 Installing Type III Speed Dome
- 2.4 Installing Type IV Speed Dome
- 2.5 Installing Type V Speed Dome
- 2.6 Installing Type VI and VII Speed Dome
- 2.7 Installing Type VIII Speed Dome
- 2.8 Installing Type IX Speed Dome
- 2.9 Installation of Network Cable Waterproof Jacket
- 2.10 Installation of Water-proof Tape
- 2.11 Protective Measures for Outdoor Installation
- 3 Activate and Access Network Camera

Network Speed Dome·Quick Start Guide
46
Note:
Make sure that all naked wires are all firmly wrapped in the water-proof tape.
6. Press the tape to make sure no water can get in as the figure below.
Press
Press
Press
Press
Figure 2-85 Press the Water-proof Tape
2.11 Protective Measures for Outdoor Installation
If the device is installed outdoors, necessary protective measures should be taken to
ensure safety. Scan the following QR code to get protective measures for outdoor
installation.